How to Submit Your App
This guide covers submitting your integration application into the Salesloft Marketplace. Submitting with Salesloft involves 3 major steps.
- Create Your Listing Account & Integration Application Walkthrough
- Submitting your integration application to the Salesloft Marketplace
- Allowlisting your integration application
If you haven't built your integration yet and are eager to do so, please head over to the Partner Portal to get started.
The Salesloft Marketplace is the the go to place to share your integration with the Salesloft community who may benefit from using it. From the time you submit it takes up to 2 weeks for this process to complete.
Please take a second to review the listing process to make sure you have everything ready to go ahead of time.
Getting Started: Become a Salesloft Partner!
- To get started, visit the Salesloft Marketplace and in the top right hand corner click Become a Partner.

- Fill out all sections of the Join the Salesloft Program form completely, and click Submit.
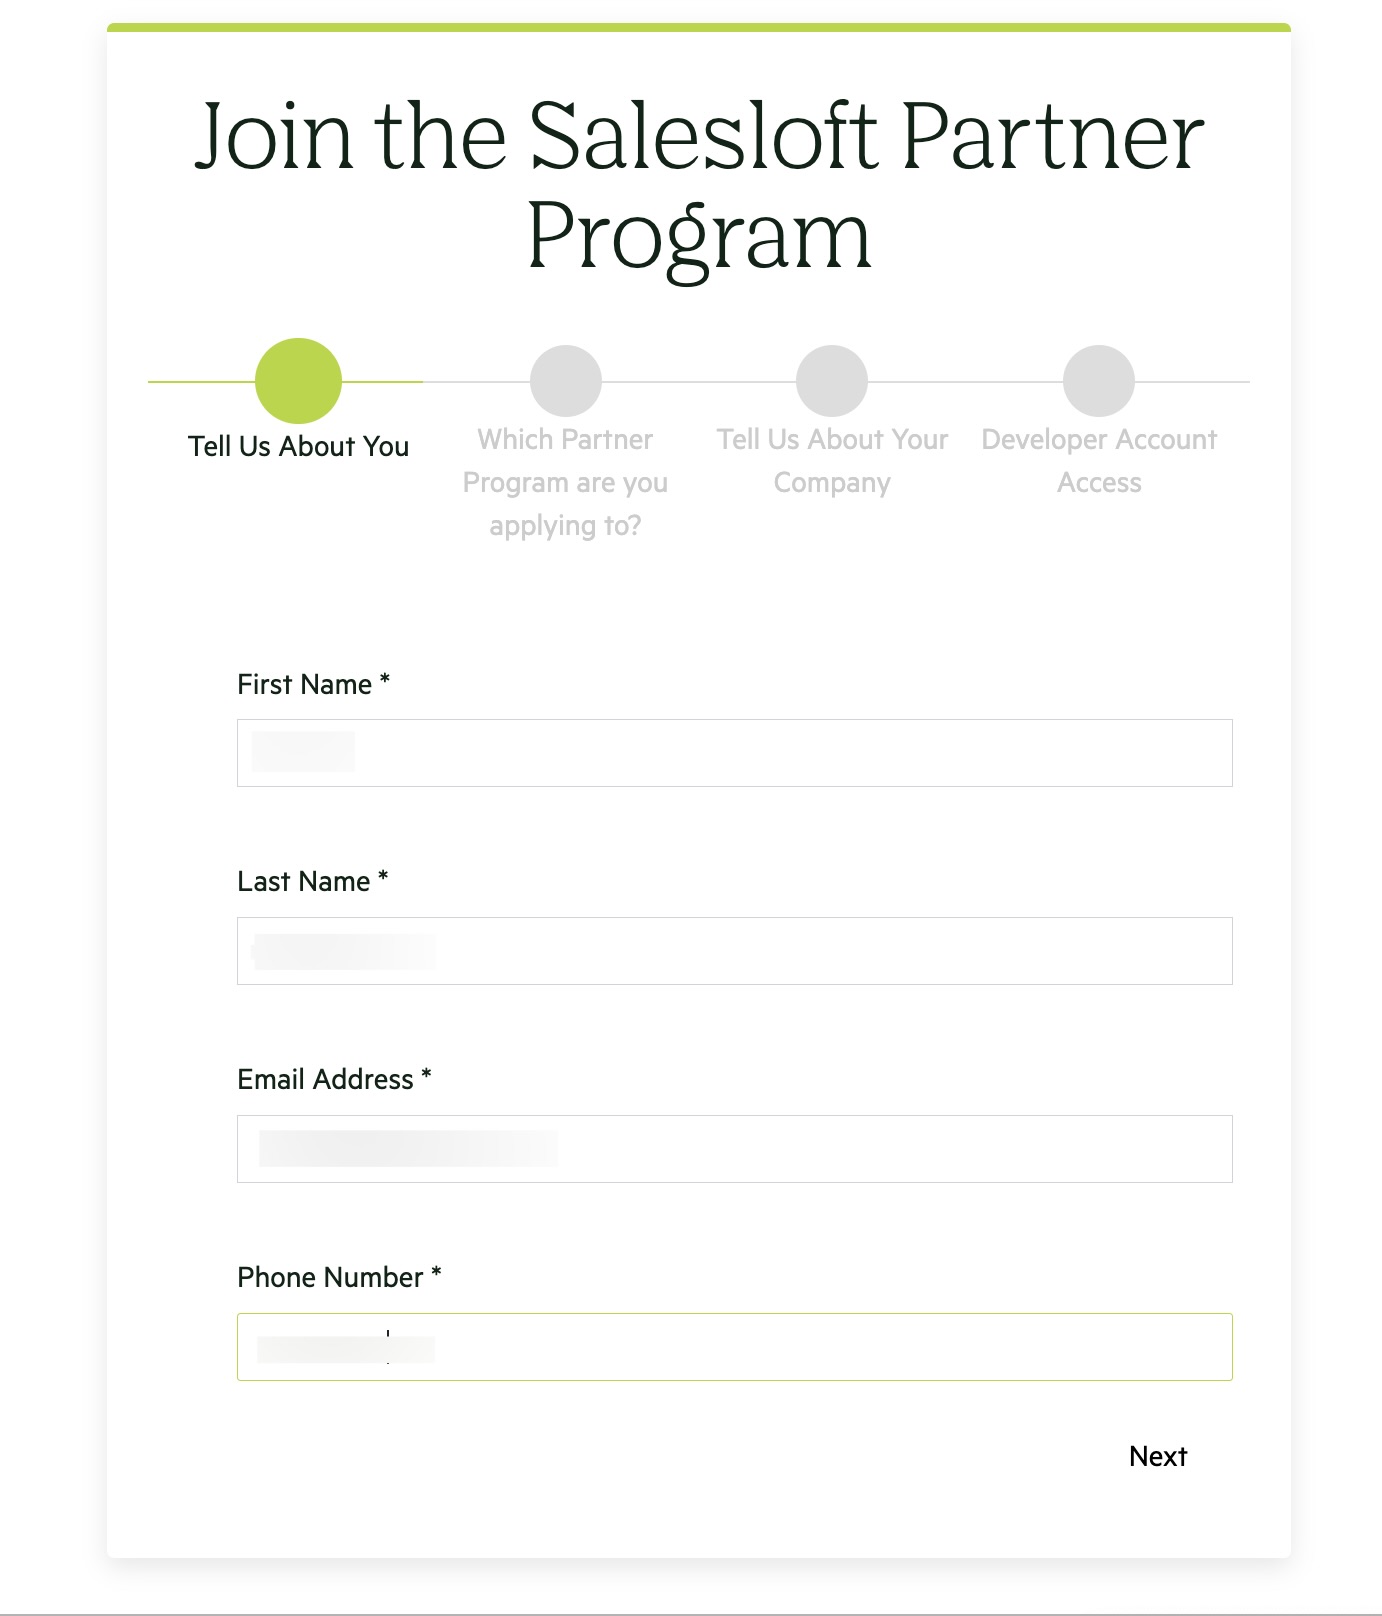
- A member of our team will review your Join the Salesloft Partner Program form.

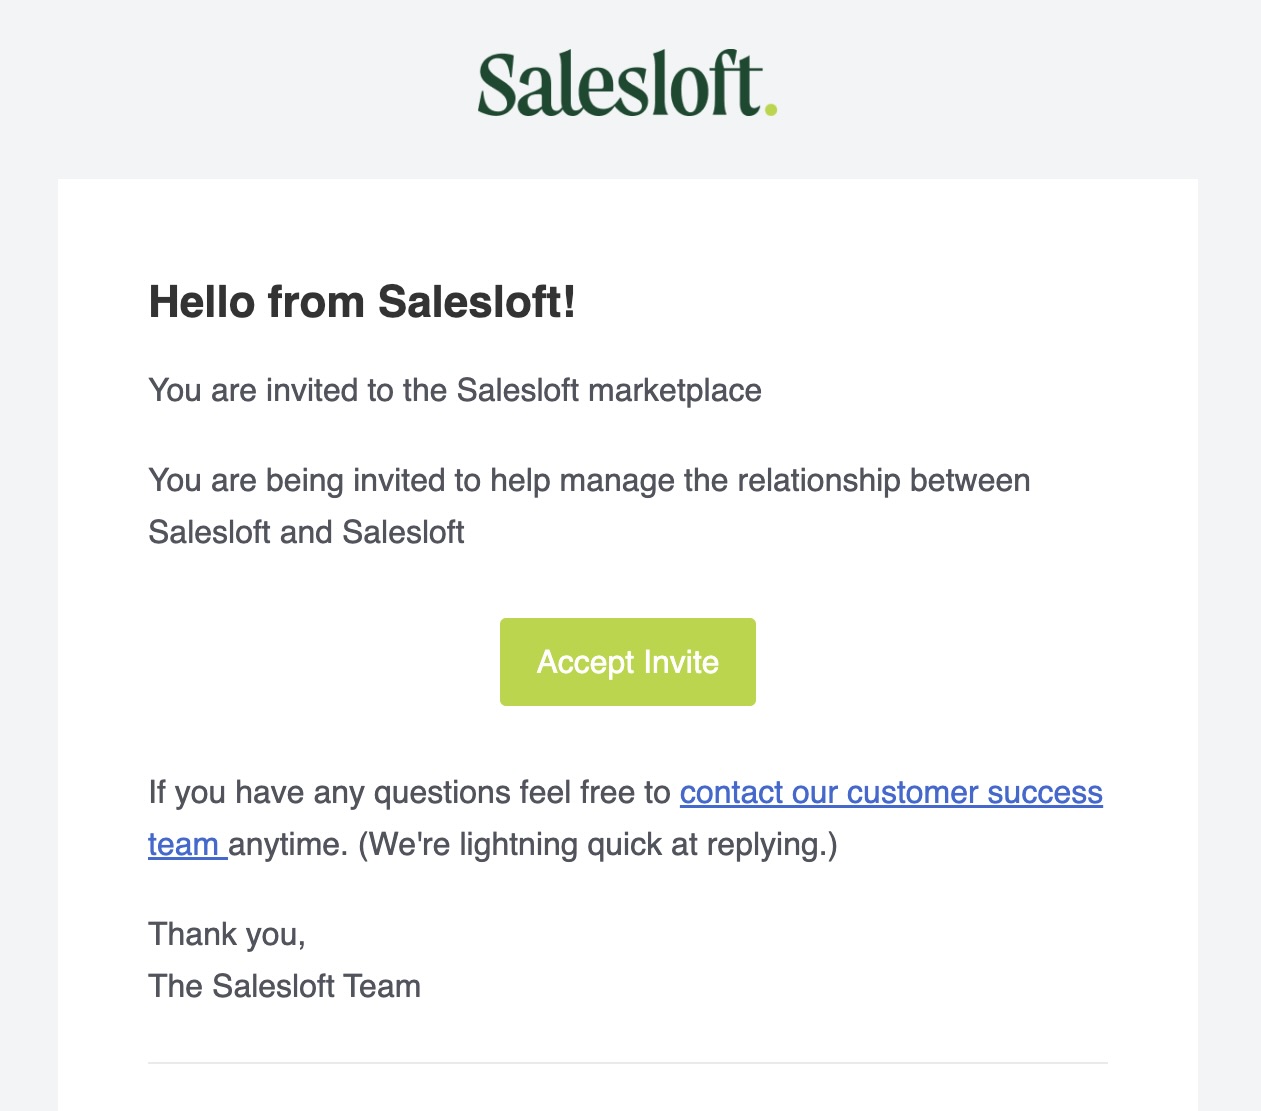
- Once your application is accepted, you will receive an email from Salesloft with the subject "You are invited to the Salesloft marketplace."
-
Click the Accept Invite button within the email to be taken to the Create an Account page.
-
Click Create Account and enter a new password then click Create.

- Your login credentials will be created and you are ready to log in and get started with creating your listing!
Create Your Listing - Account
In order to create your listing you must fill out the Join the Salesloft Partner Program application. If you have not done so already, please follow the steps in "Getting Started: Become a Salesloft Partner" before proceeding.
- Go to the Salesloft Marketplace, click the Partner Portal button on the top right side of the page and enter your login credentials.

-
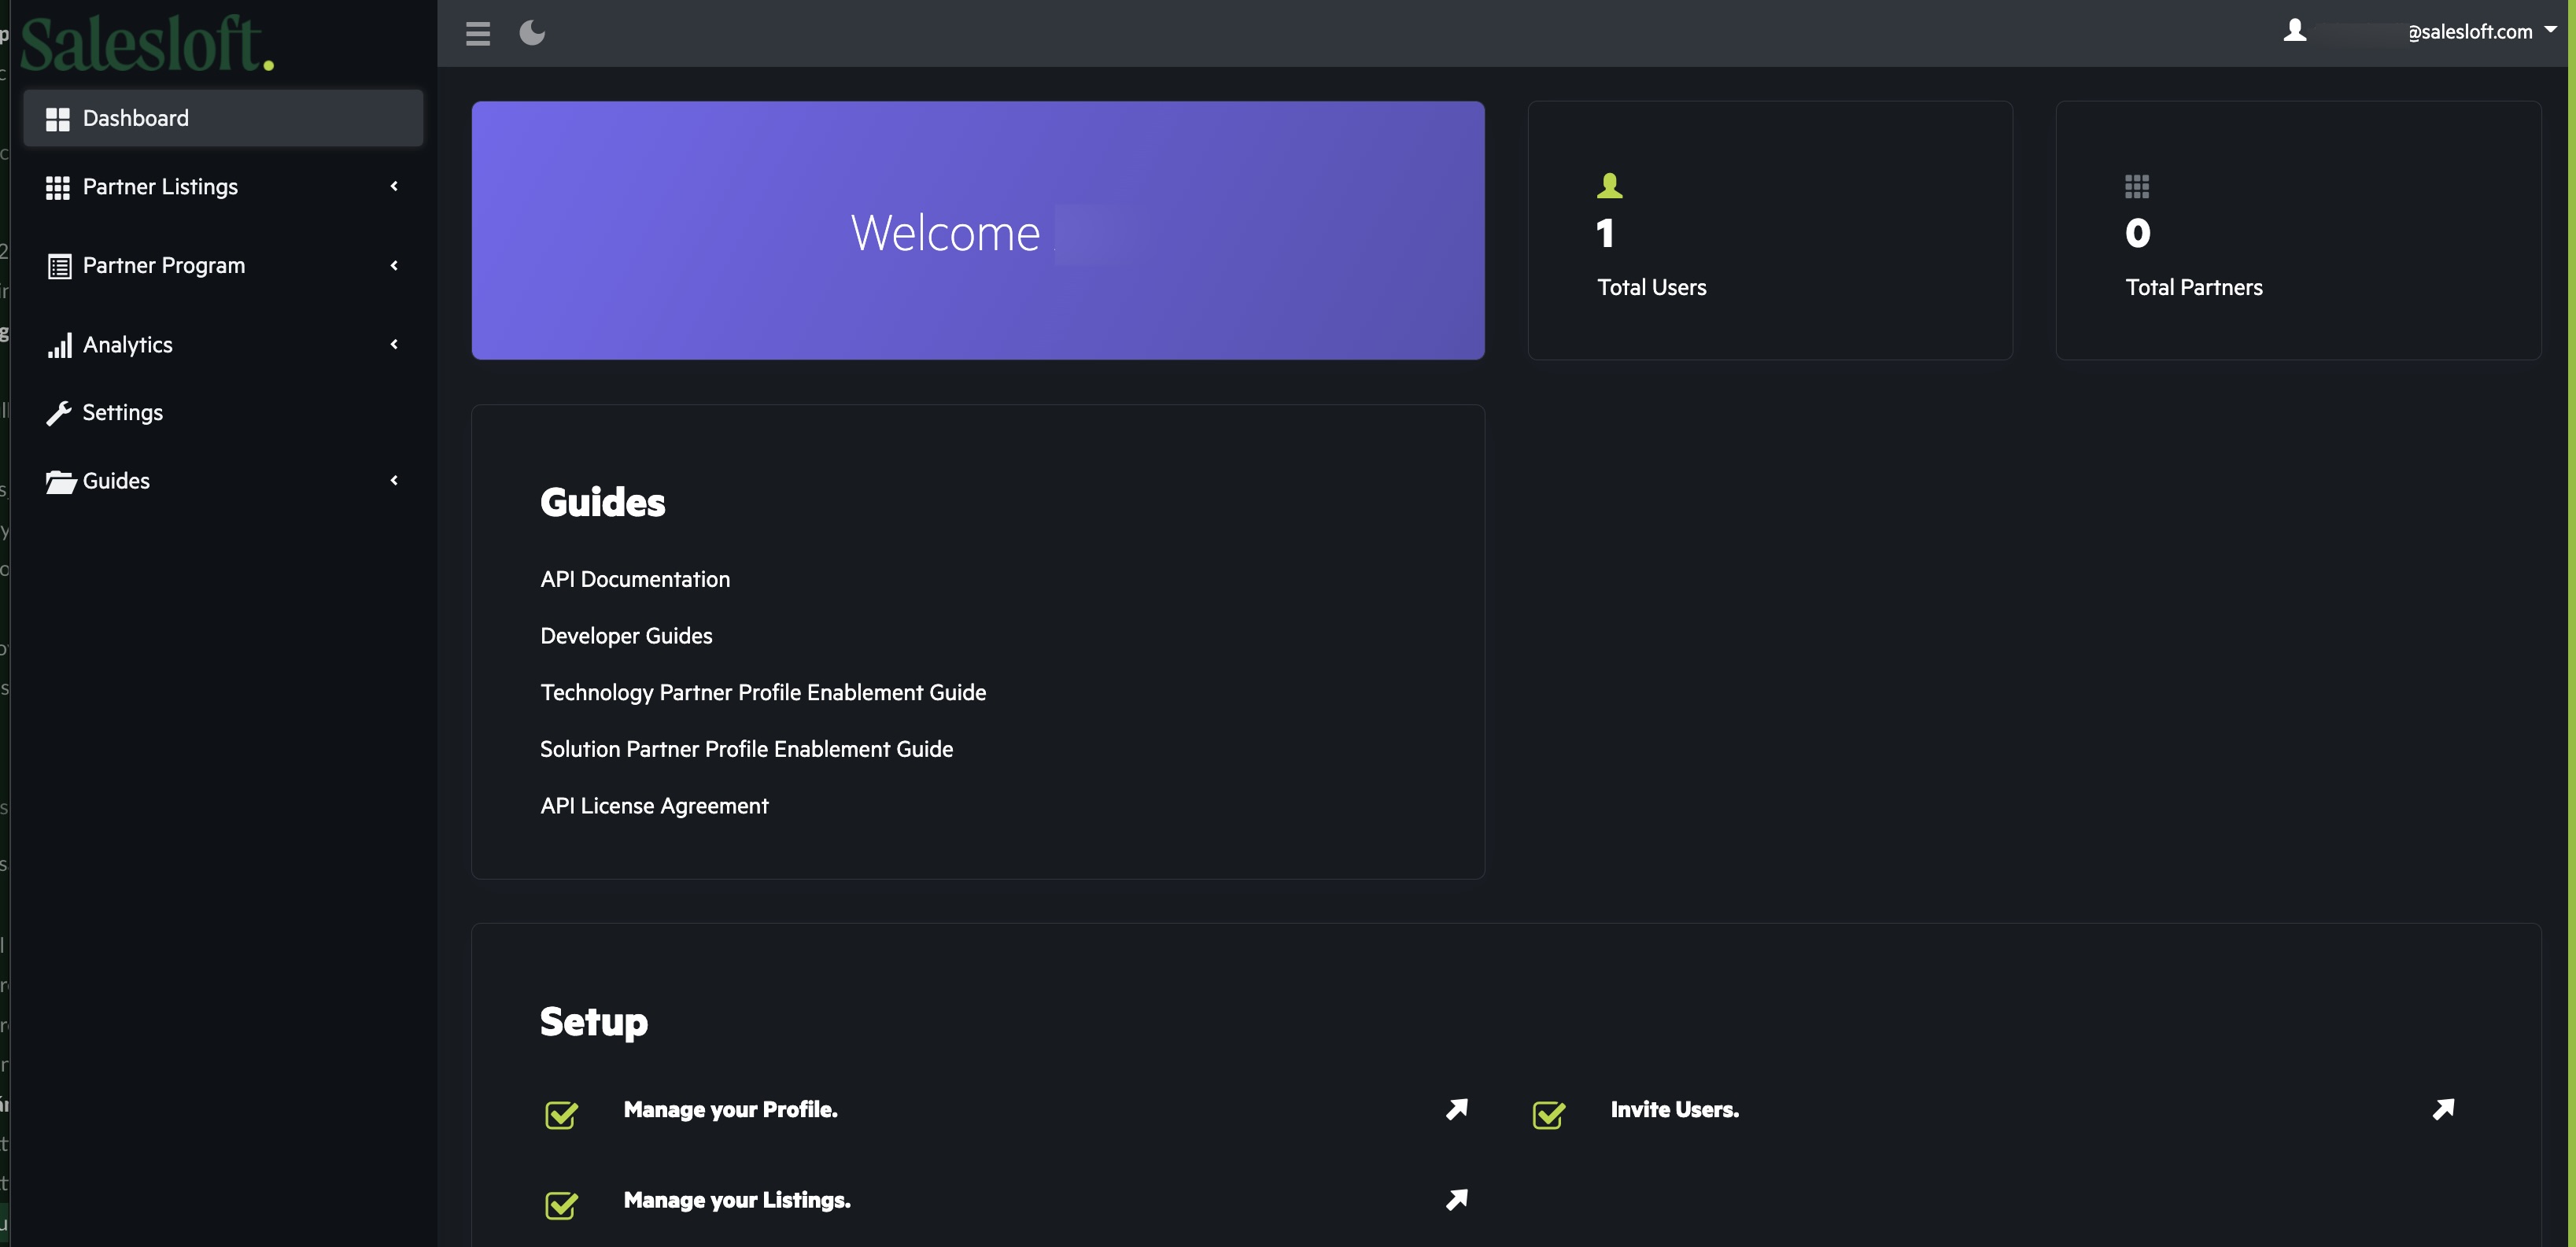
Once you log in, you will be brought to the Dashboard, which houses resources including:
- Integration Documentation
- Direct links to set up your profile
- Manage your listing & Invite additional users
- Reports on views and interactions with your listing
-
To create a new listing:
- Click the Manage your Listings button on the Dashboard OR Go to the Partner Page section on the left side of the menu and click the New Partner Listing page button in the green box in the upper right hand corner.
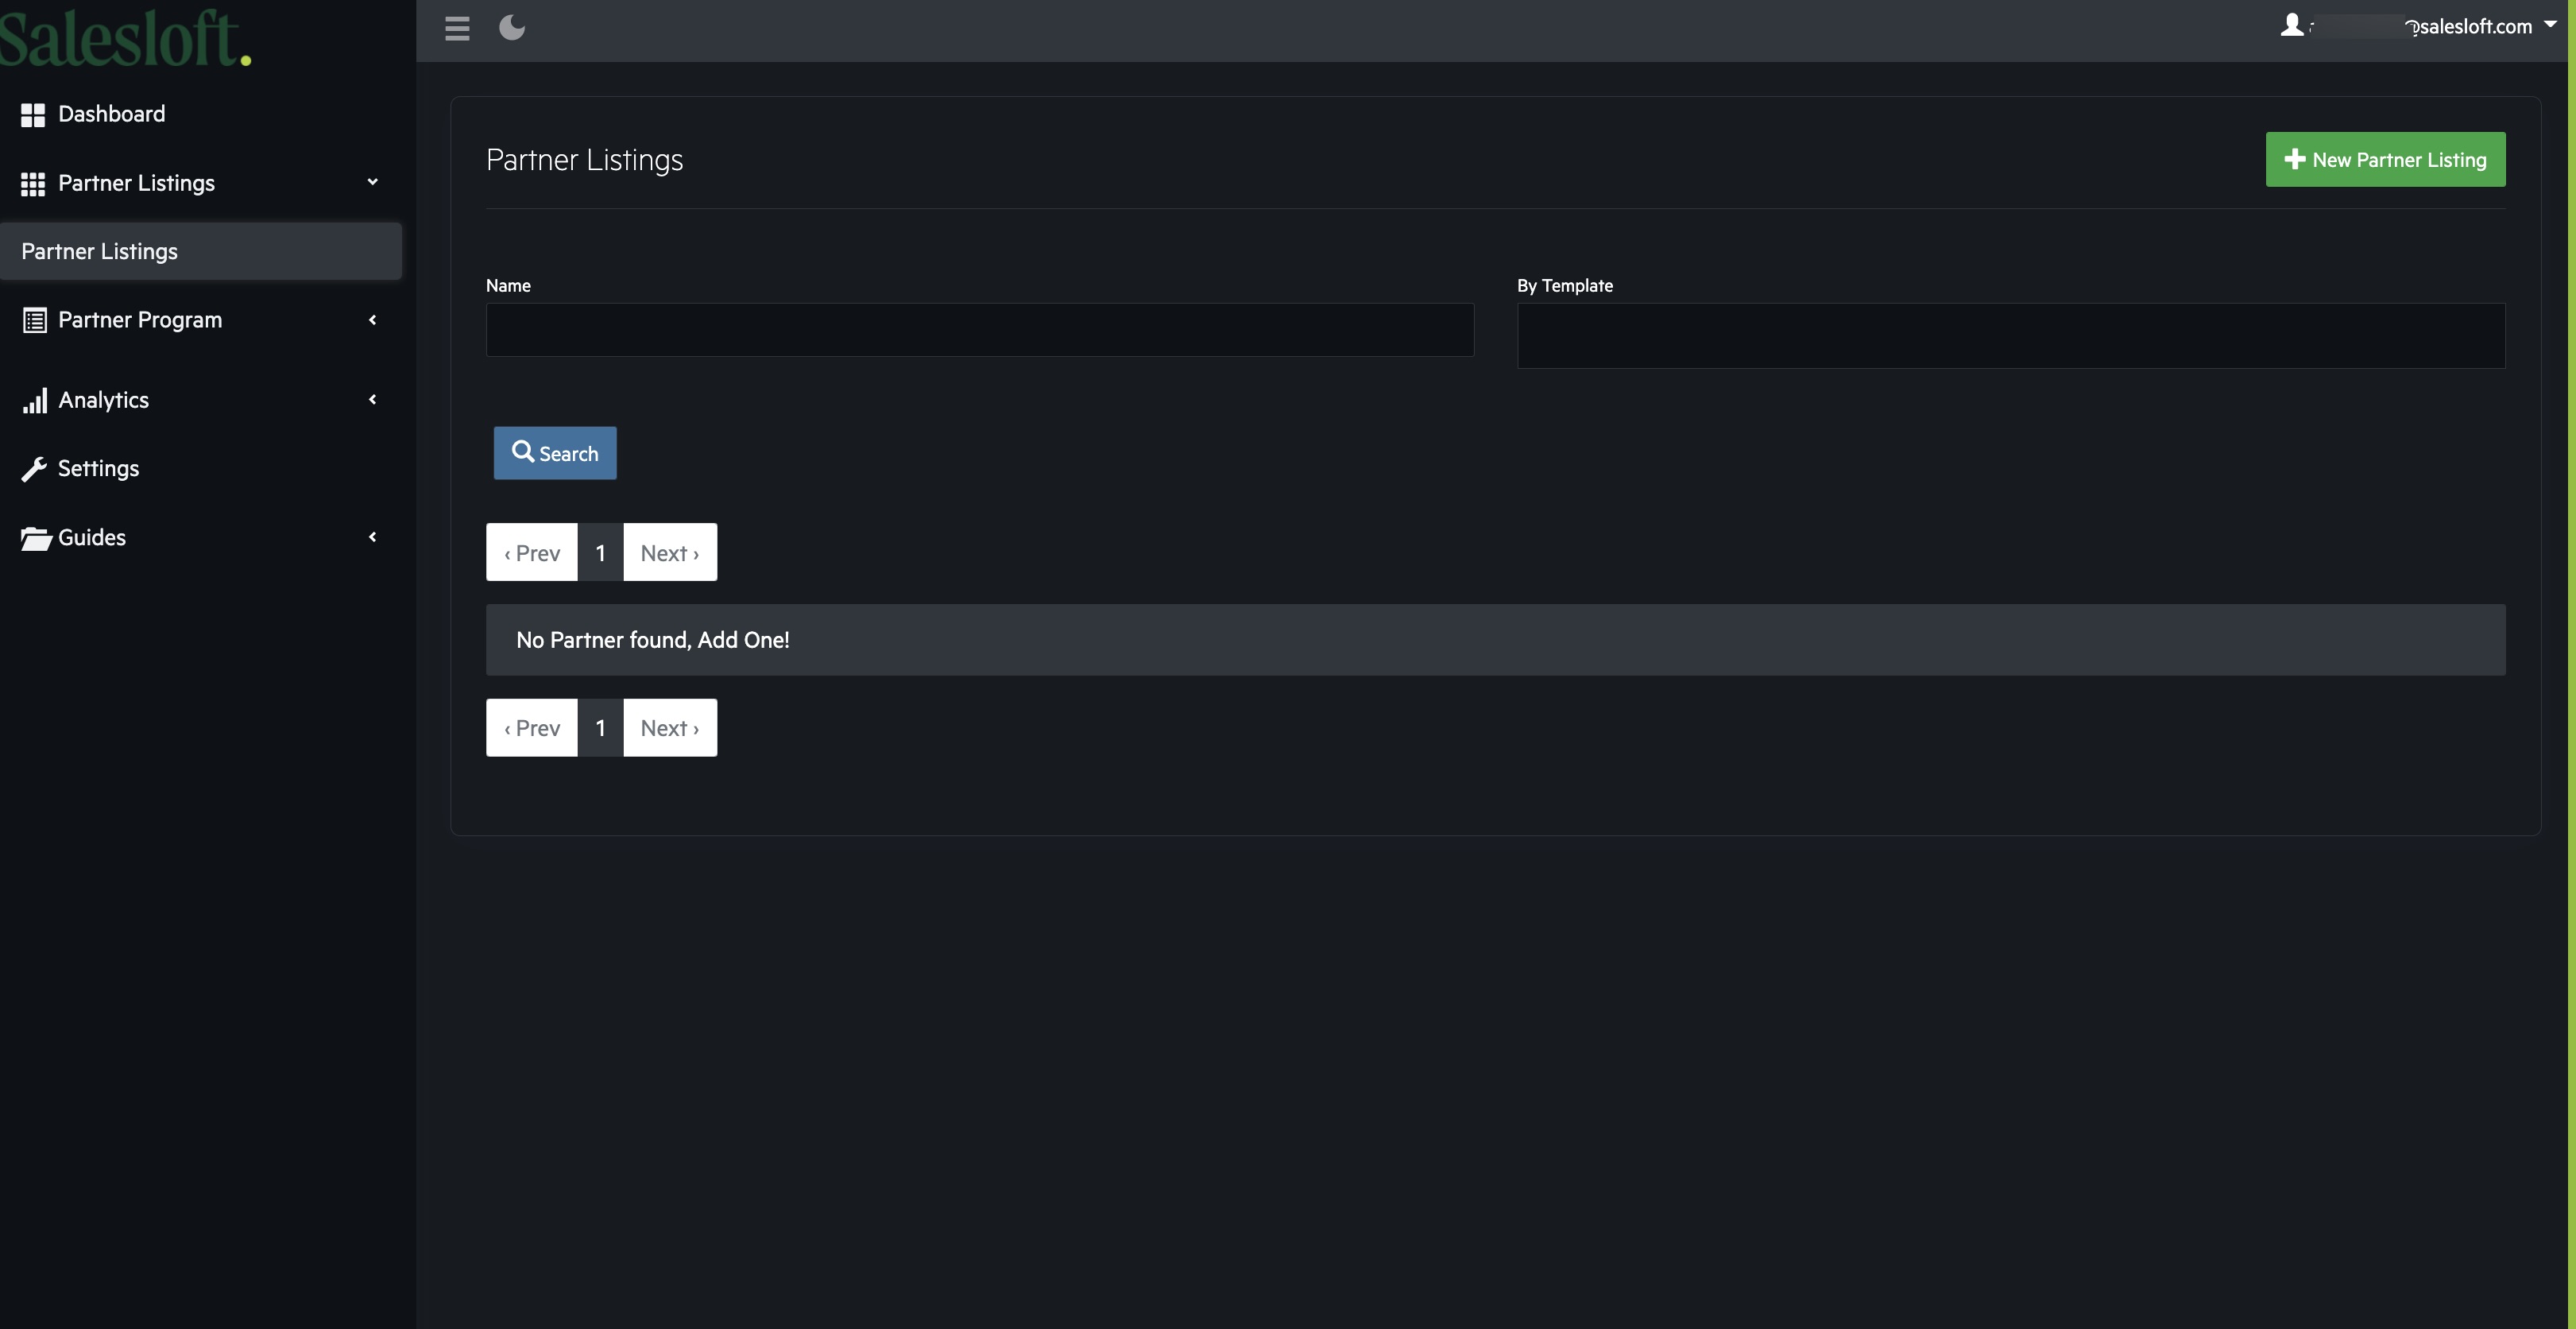
- Enter the name of your listing, which should be your company name, and choose the Technology Integrations - Ecosystem template option. Click Create!
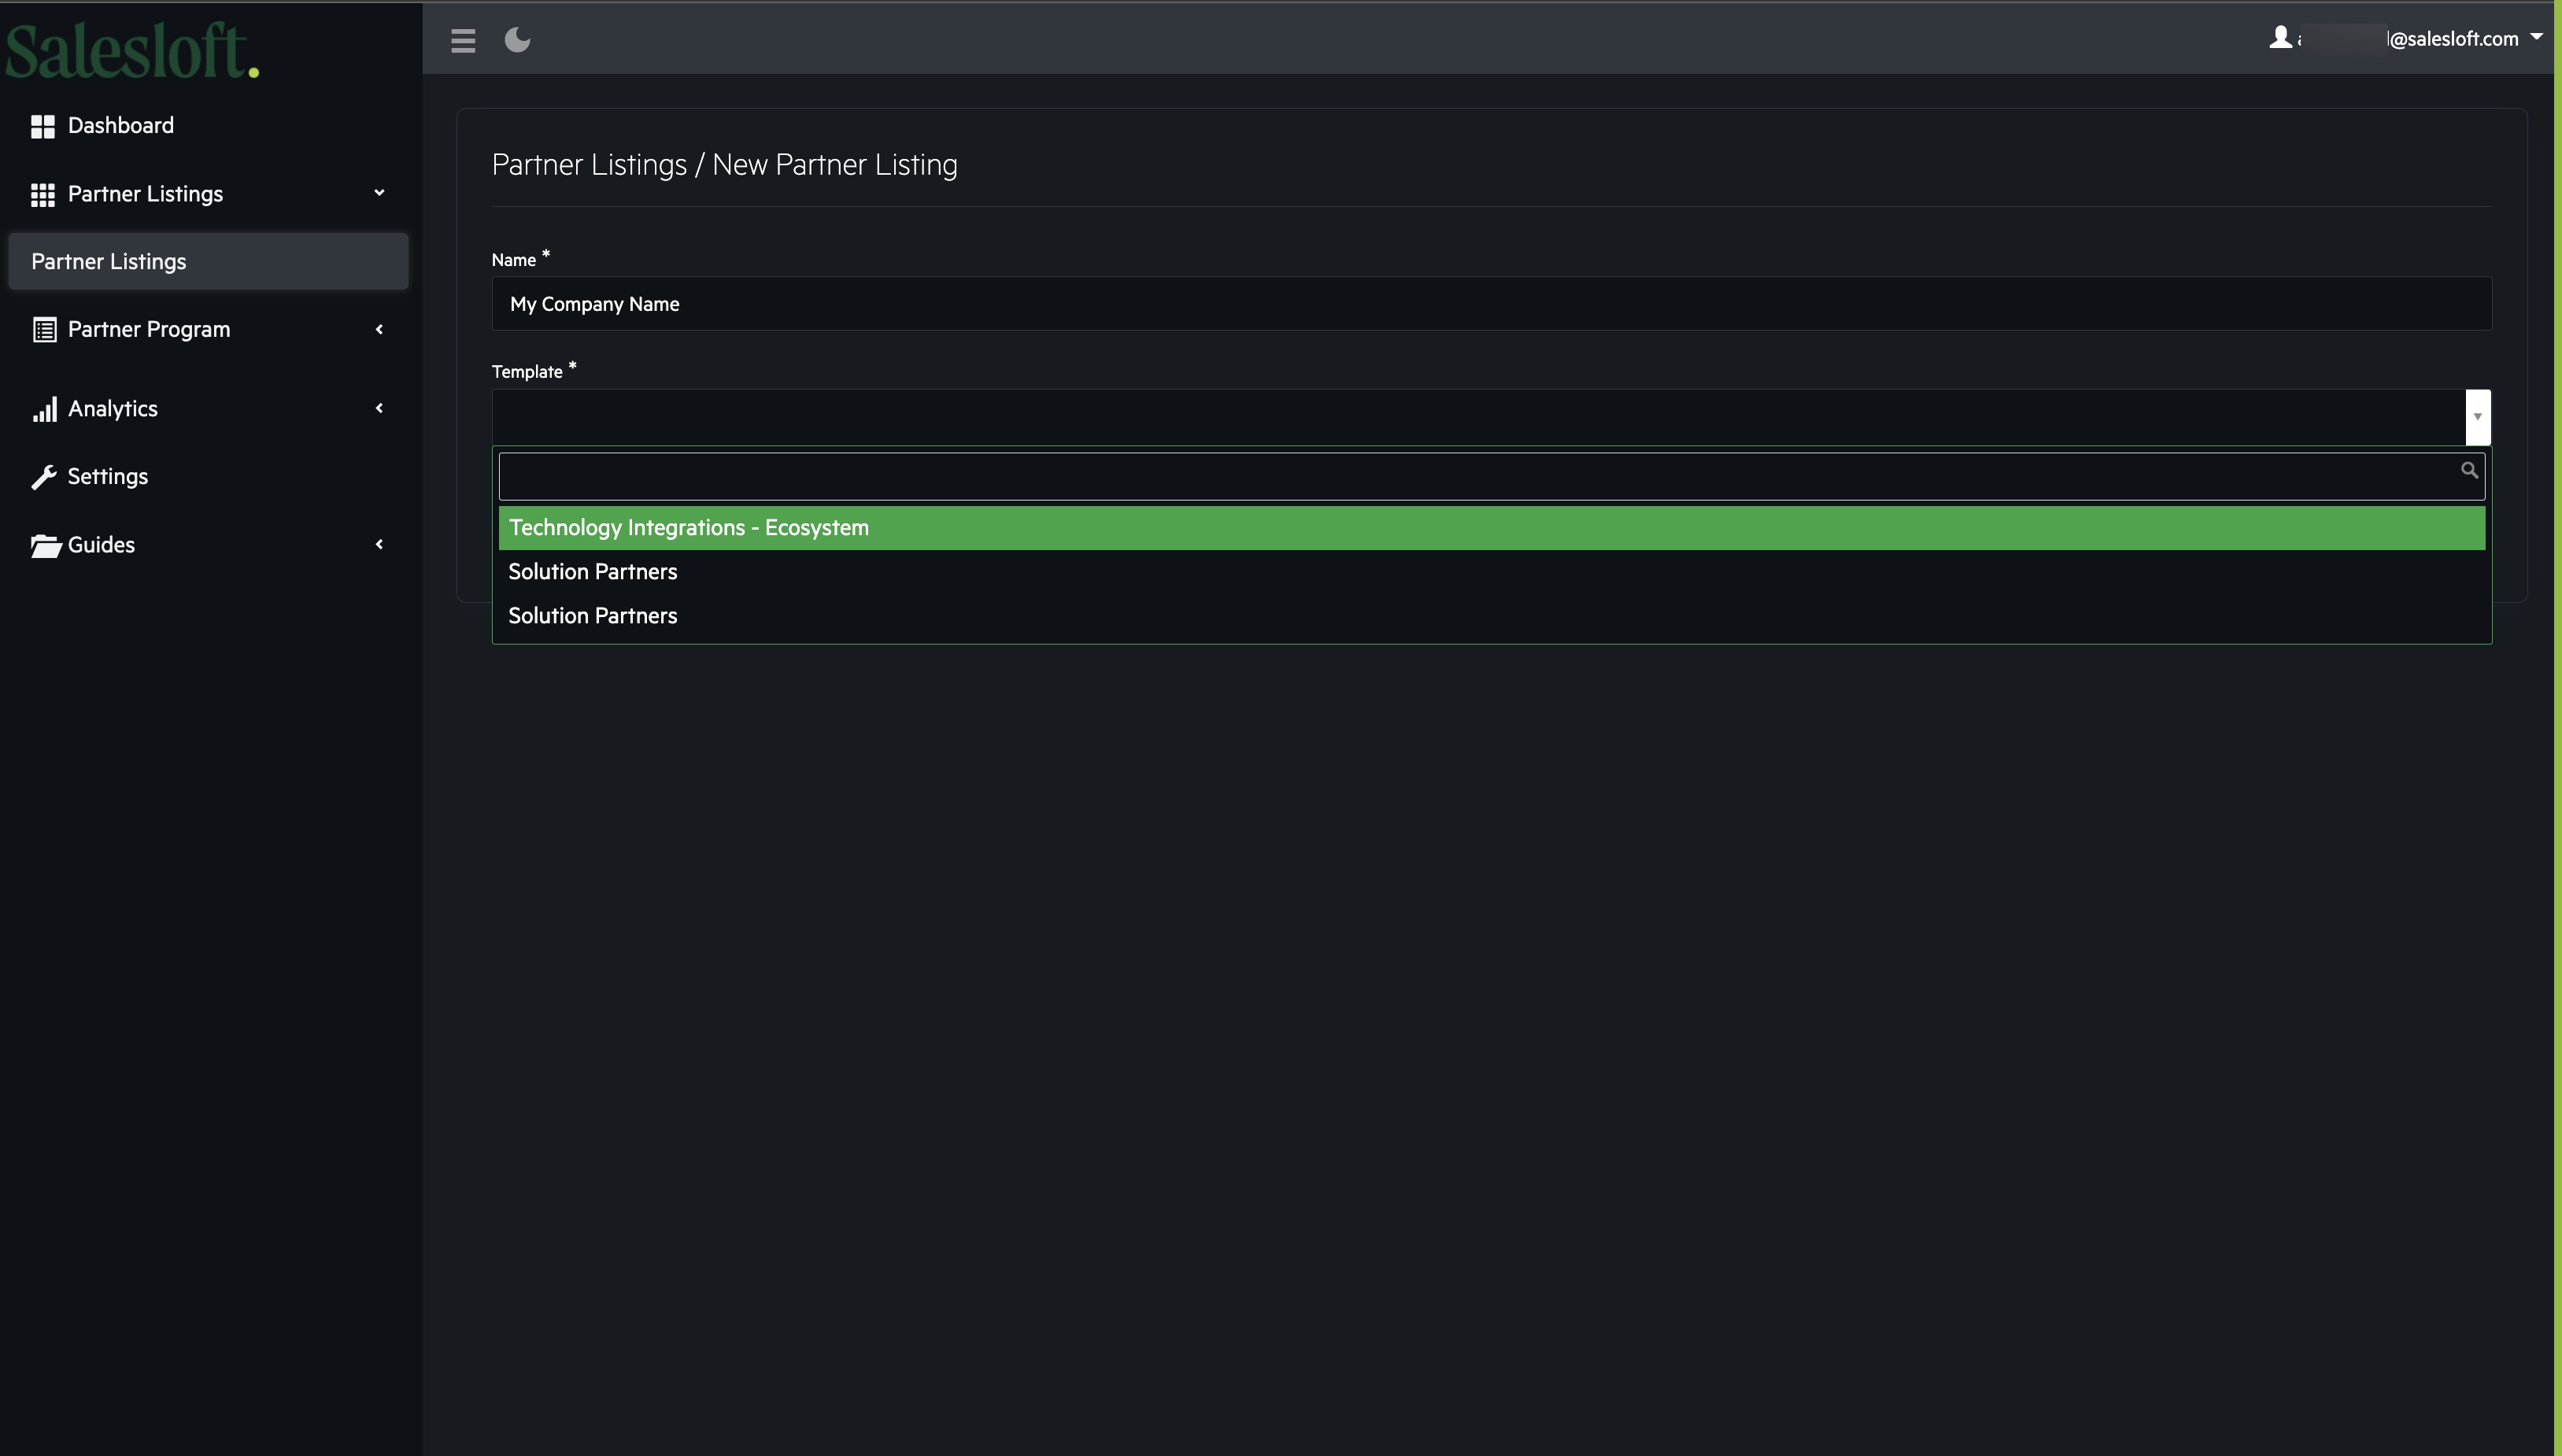
- Click the Manage your Listings button on the Dashboard OR Go to the Partner Page section on the left side of the menu and click the New Partner Listing page button in the green box in the upper right hand corner.
Create Your Listing - Application Walkthrough
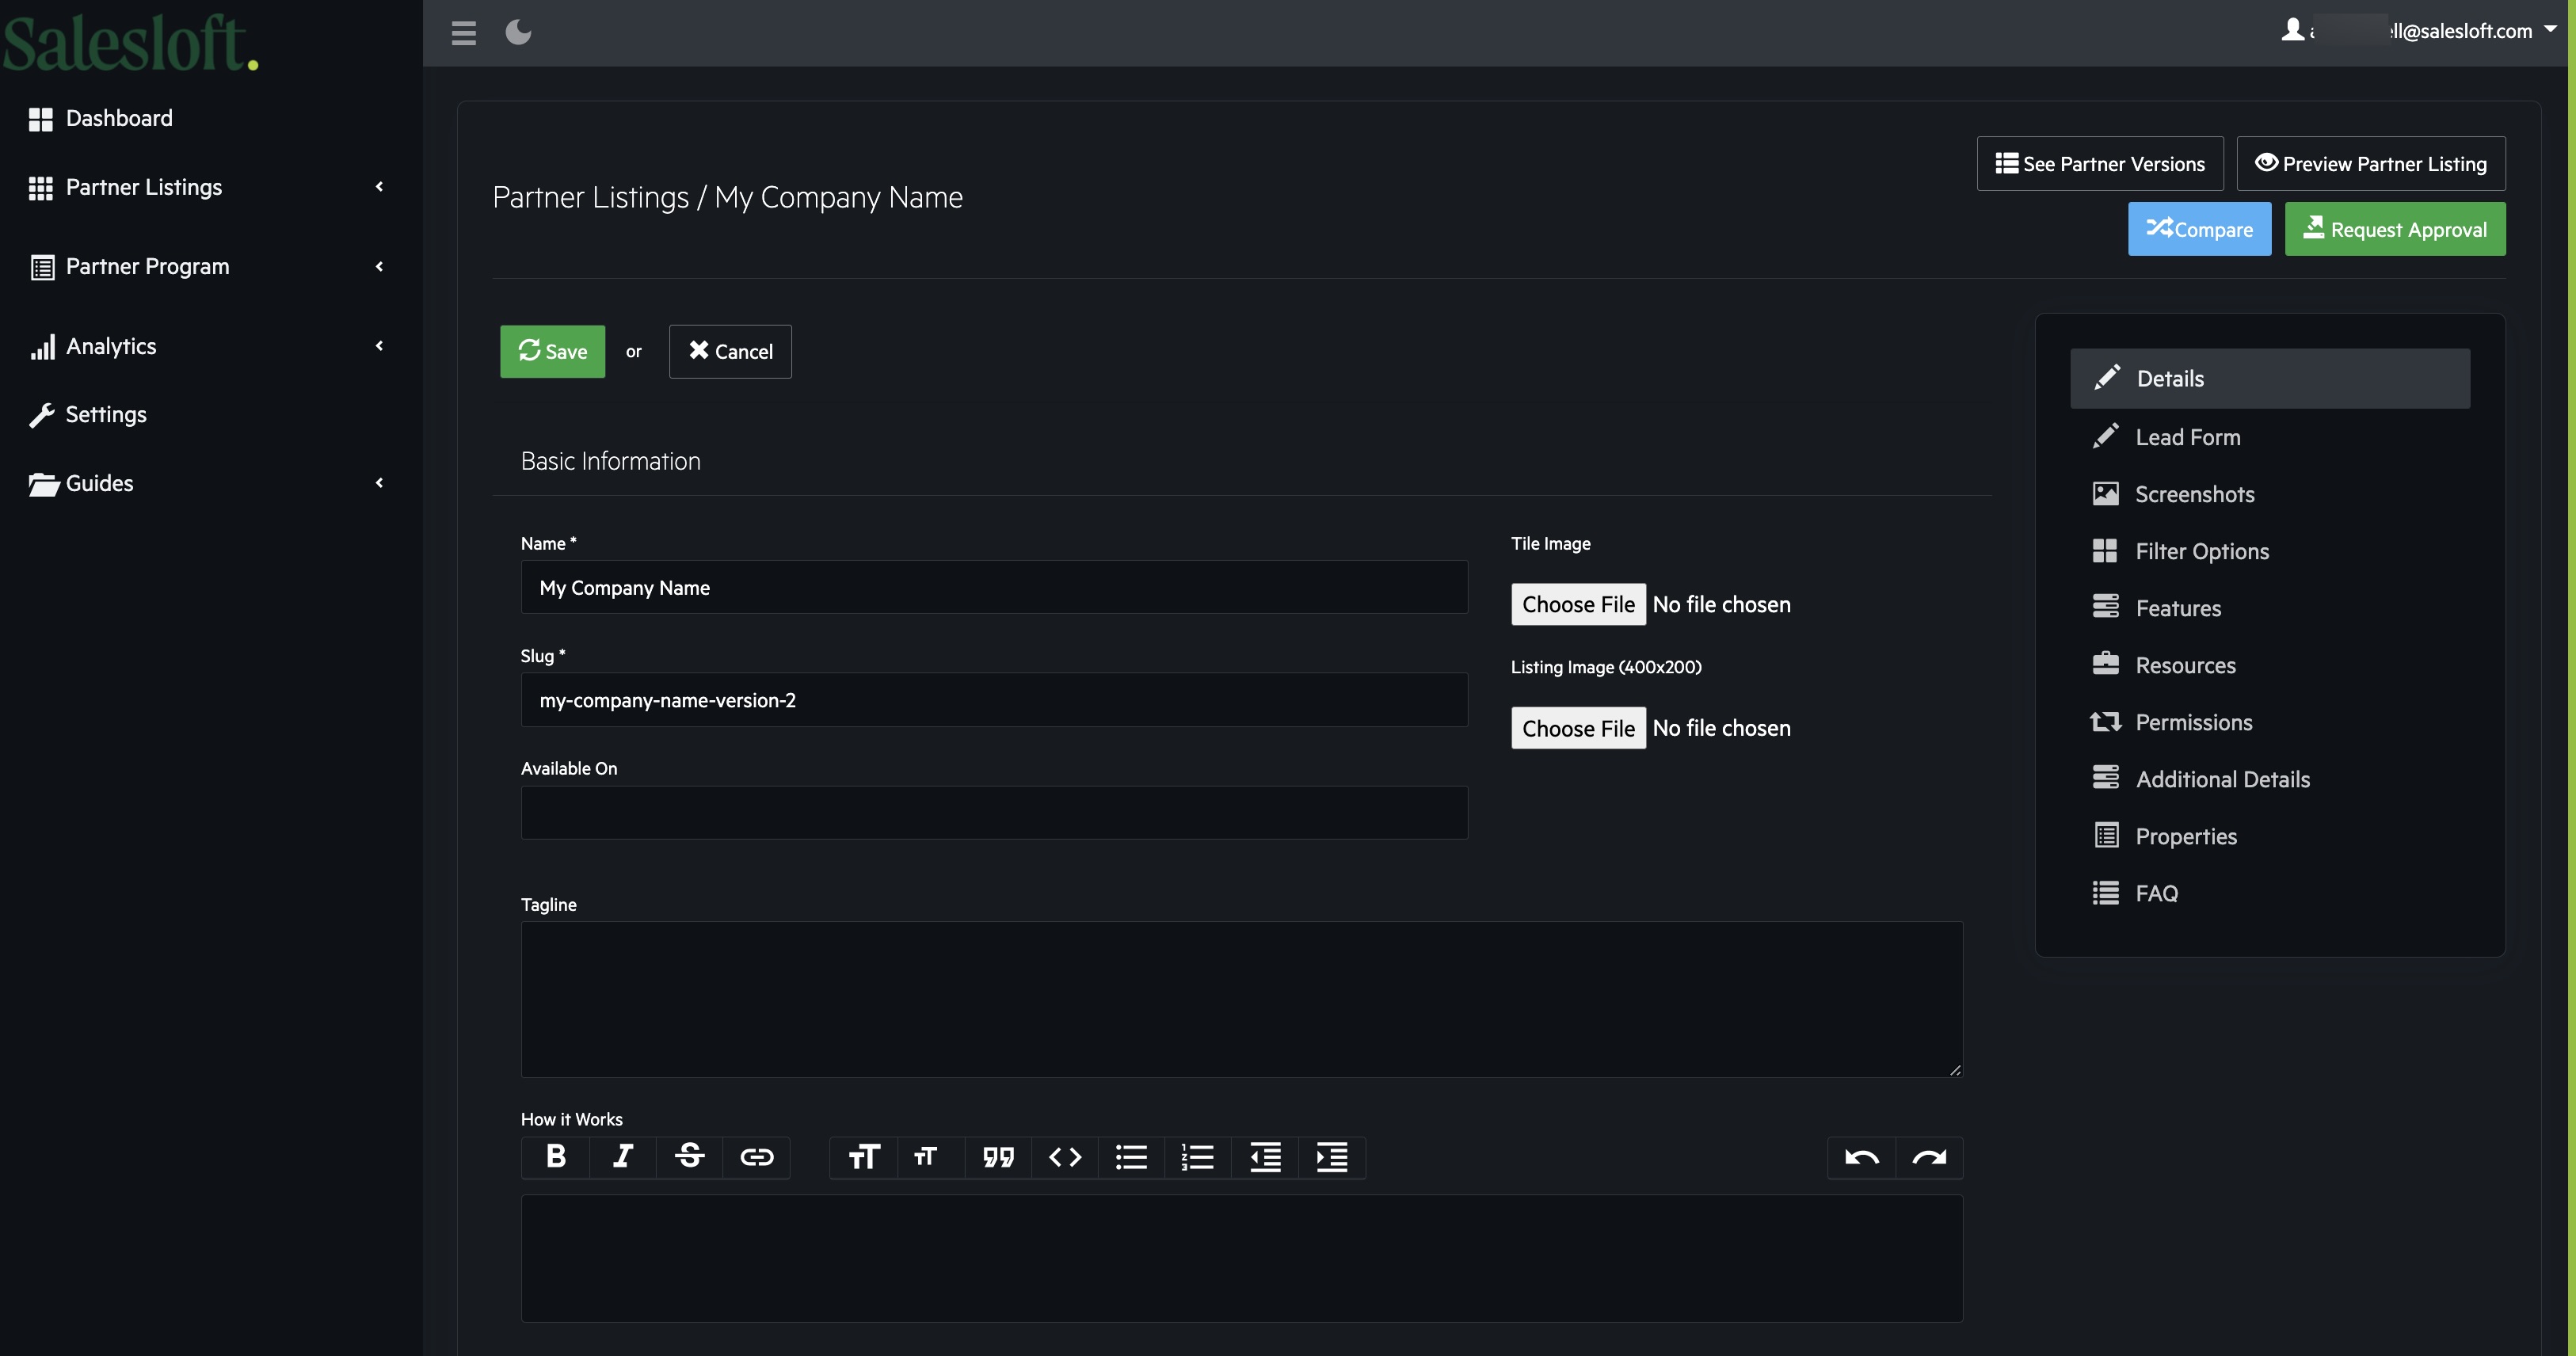
To create your listing, fill out the fields shown for submission. Please keep in mind that the fields listed below are required fields in order for your application to be approved. Once complete, Click Save!
-
Tile Image: Should be an icon, square image, logo.
-
Listing Image: Should be a long form logo; see the preview of the header image we will generate for you that will appear on the headline of the profile once opened.
-
Tagline: One or two sentence attention grabber to gauge the interest of the customer or prospect.
-
How it works: A description of how the integration works within the Salesloft platform and the value it brings/key call outs to make.
-
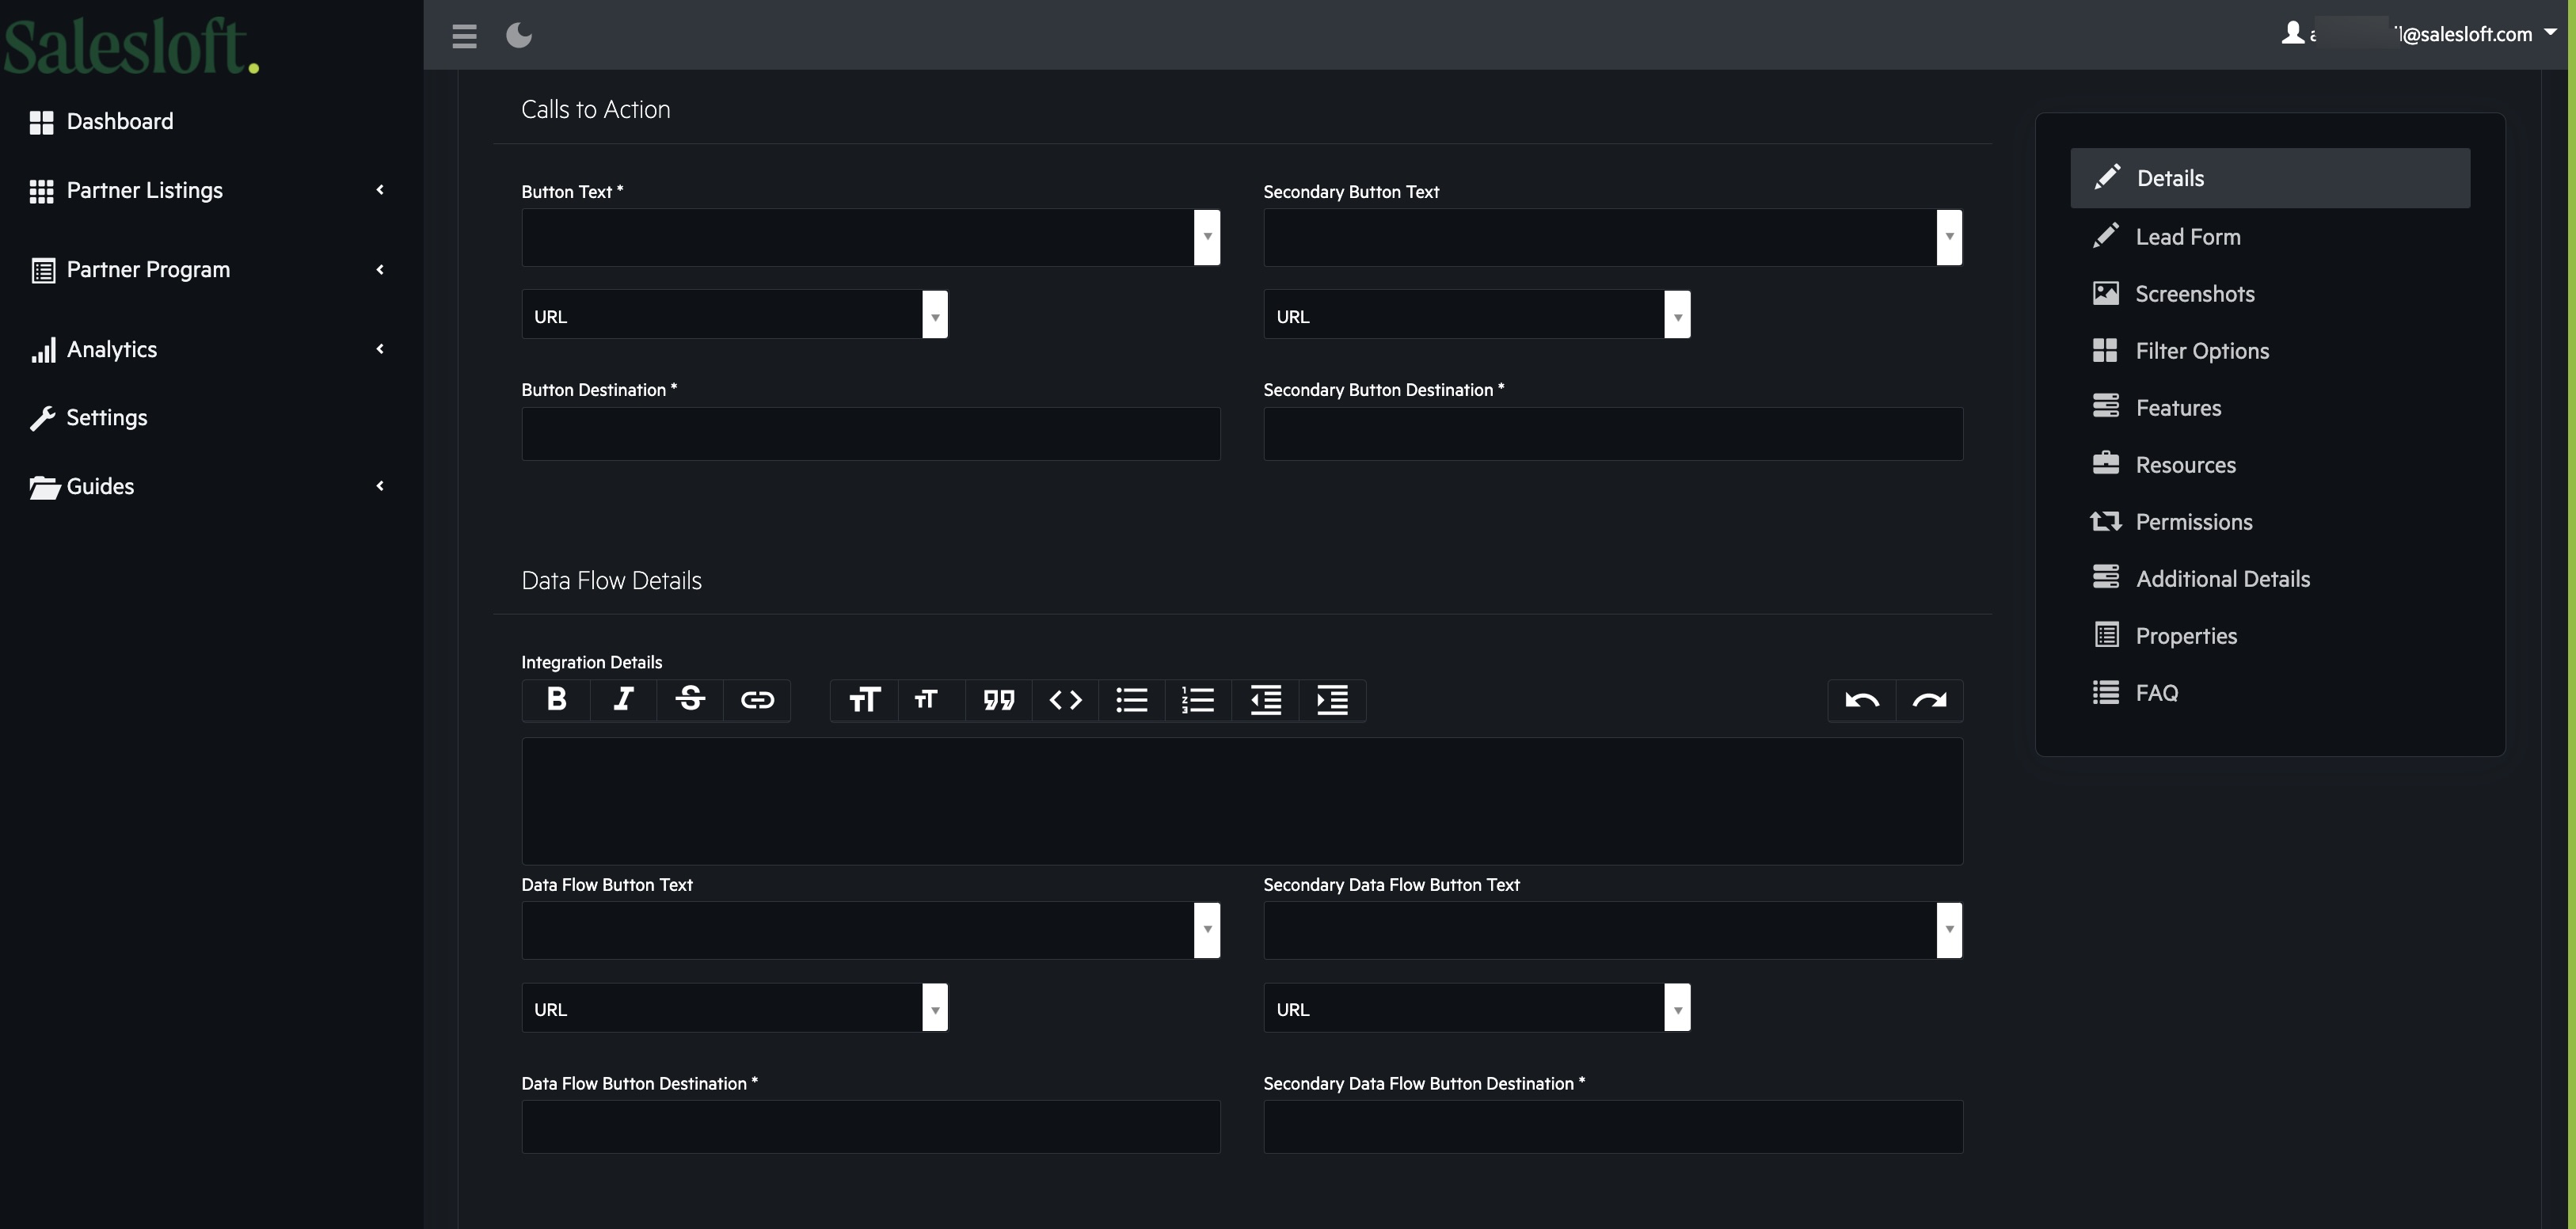
Call to Action Buttons: Choose 2 Call to Action Buttons you would like to add to the profile out of the following options: Request a Demo, Install, or Learn More. Then enter whether you will be using the Lead From, or a URL with the button destination entered below.
-
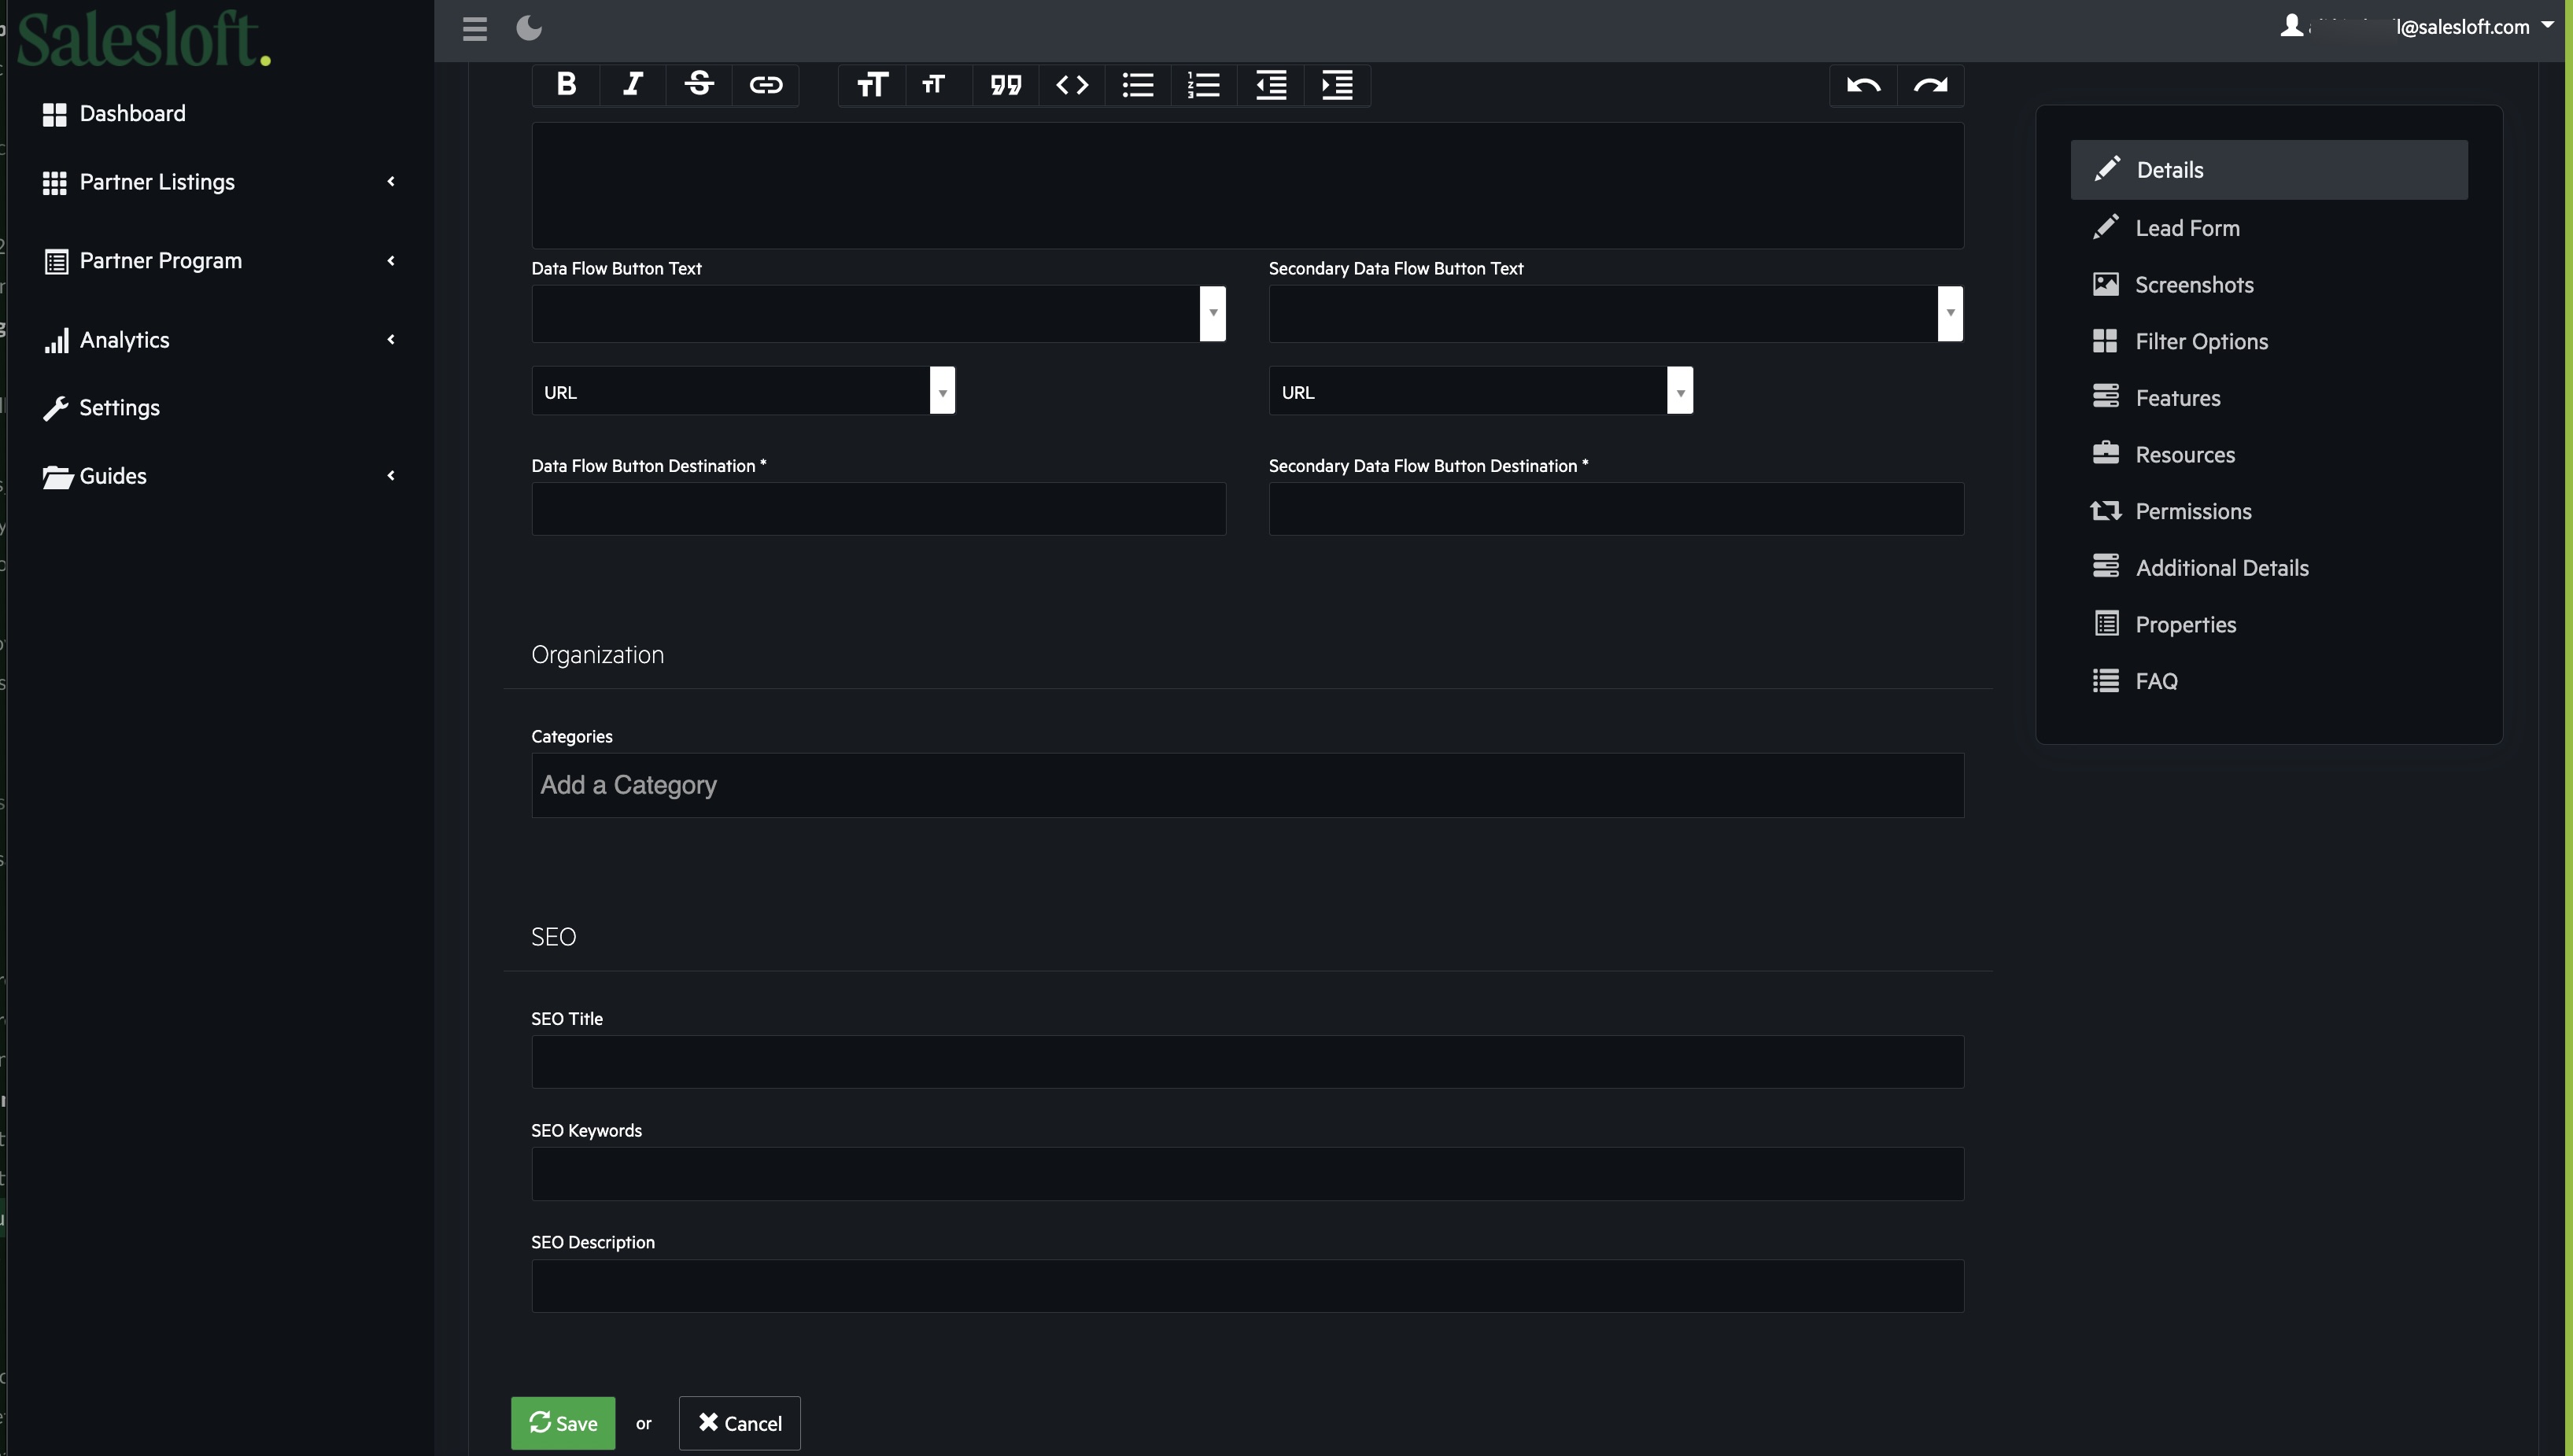
Data Flow Details: This is the way in which data flows, based on your integration. Add any need to know, as well as the instructions on how to to set up the integration itself, and any expectations, or outcomes that can be expected inclusive of timeframes. Also, add additional CTA buttons if needed!
-
Organization: This will help organize your listing and make searching for your product solution easier and faster to find!
-
Categories: Select which categories fit with your solution best i.e., Technology, CRM, Account Based, etc.
-
SEO: Add 1 or 2 word SEO terms - this is what helps your listing get visibility on search engines!
Using the menu on the right side, add the following content and complete the categories

-
Lead Form: Fill out the information on where any leads submitted to the marketplace should be delivered to! Then click Save.
-
Screenshots: We recommend that you add at least 3 screenshots, with a requirement of at least 1 showing how your product works with ours (in Salesloft). A screenshot can be an uploaded png, gif, or jpeg; they can also be youtube links. Some suggestions here are specific features you'd like to call out, a walk through of your integration, and more!
-
Features: Here is your time to shine! Call out your top 3 - 4 features that will show off your product and describe the value best! Click Create!
-
Resources: Link out to or upload articles, case studies, integration documentation and more using the resources section. Just add the title, text, and any need to know details! Click Create!
-
Permissions:
- Object: name of the data object in Salesloft
- Data Flow Direction: Used to identify if this data is pulled into Salesloft or pushed to Salesloft.
- Partner Object: Data object in your system.
- Click Create!
-
Properties: Standardized links that show on the left side of the profile listing, including: Support, Website, Documentation, & Terms of Service. Click Save!
-
FAQ: Add your Frequently asked questions and answers here! Click New FAQ in the green box at the top of the page, and add the Q&A's that best fit your listing. For each one, Click Create!
Submitting your application/integration for allowlisting
In the top right of the page, you can see the partner versions, preview the partner page you created, compare differences from previous versions and lastly, request approval for the page to be approved and published live to the marketplace.

Once the profile has been submitted for approval, the Salesloft team will review the listing to ensure all the requirements have been met and correct branding is in place.
Allowlisting
Once you have created your app/built your integration, you must submit it to our development team to be reviewed for allowlisting (to be used by other Salesloft instances). The Salesloft team reviews all apps listed in the directory to ensure they provide users with a great experience and comply with our API Terms of Service, Design Guidelines, and Brand Guidelines.
The Salesloft Development Team has created this comprehensive App Submission Checklist to be followed to ensure your app goes through the review process quickly and smoothly, and covers the most common points of failure during the review. Also, be sure to review this Allowlisting Checklist, to ensure you have completed all necessary requirements.
To Submit Your App for Allowlisting:
- Follow the Steps for Getting Started and Creating Your Listing. (Content can be added later on or ahead of time to the Marketplace Listing.)
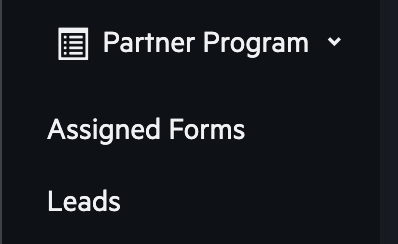
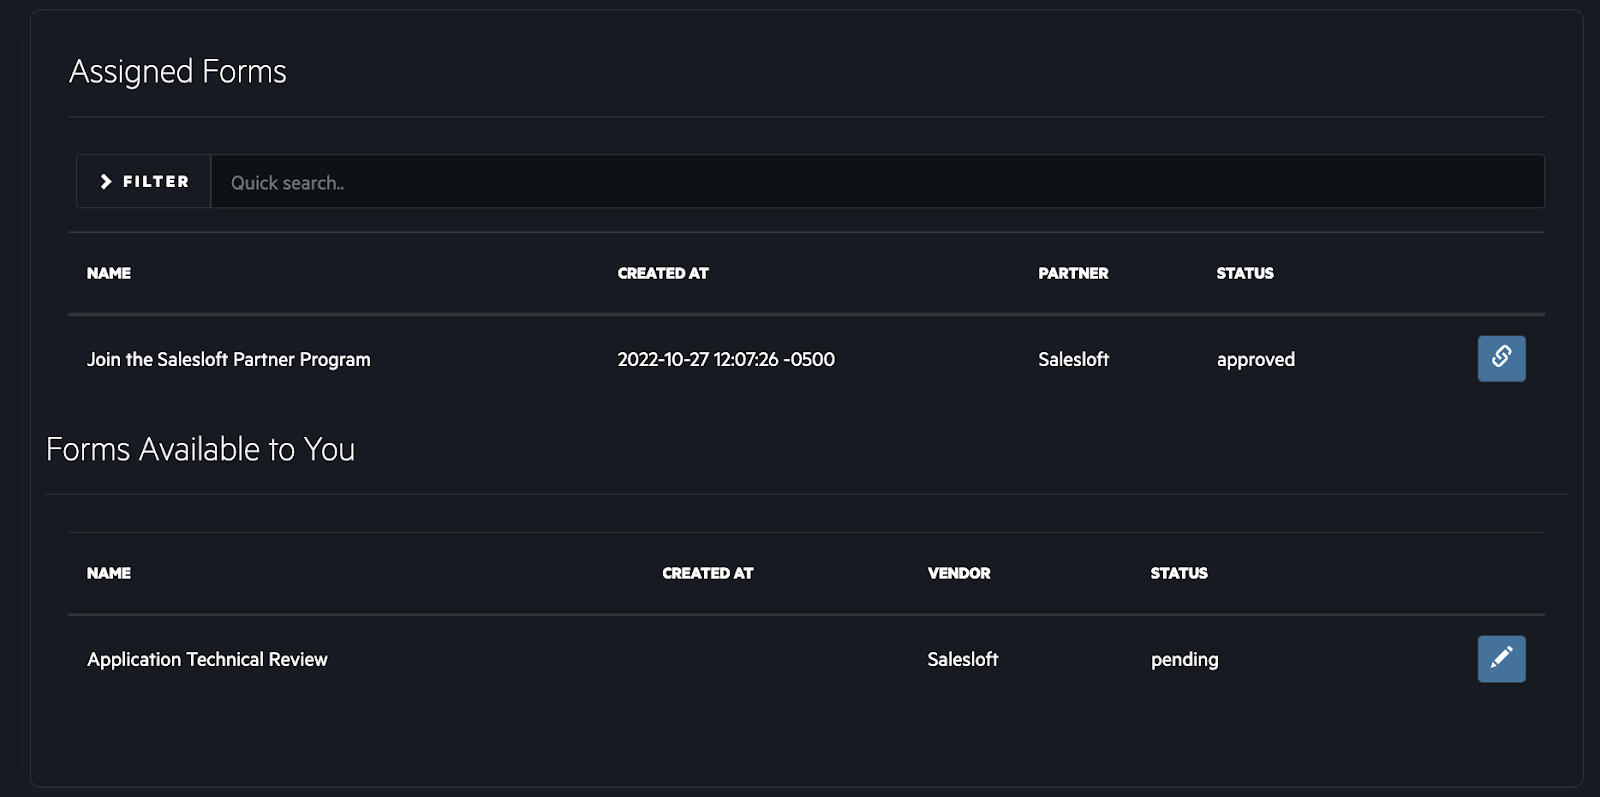
- In the menu on the left side of the page, click the Partner Program dropdown, and then click Assigned Forms.
- Under the Forms Available to You section, look for the Application Technical Review Form; click the blue pencil icon on the right to begin editing the form for submission.
- Fill out the forms, with the following information required:
-
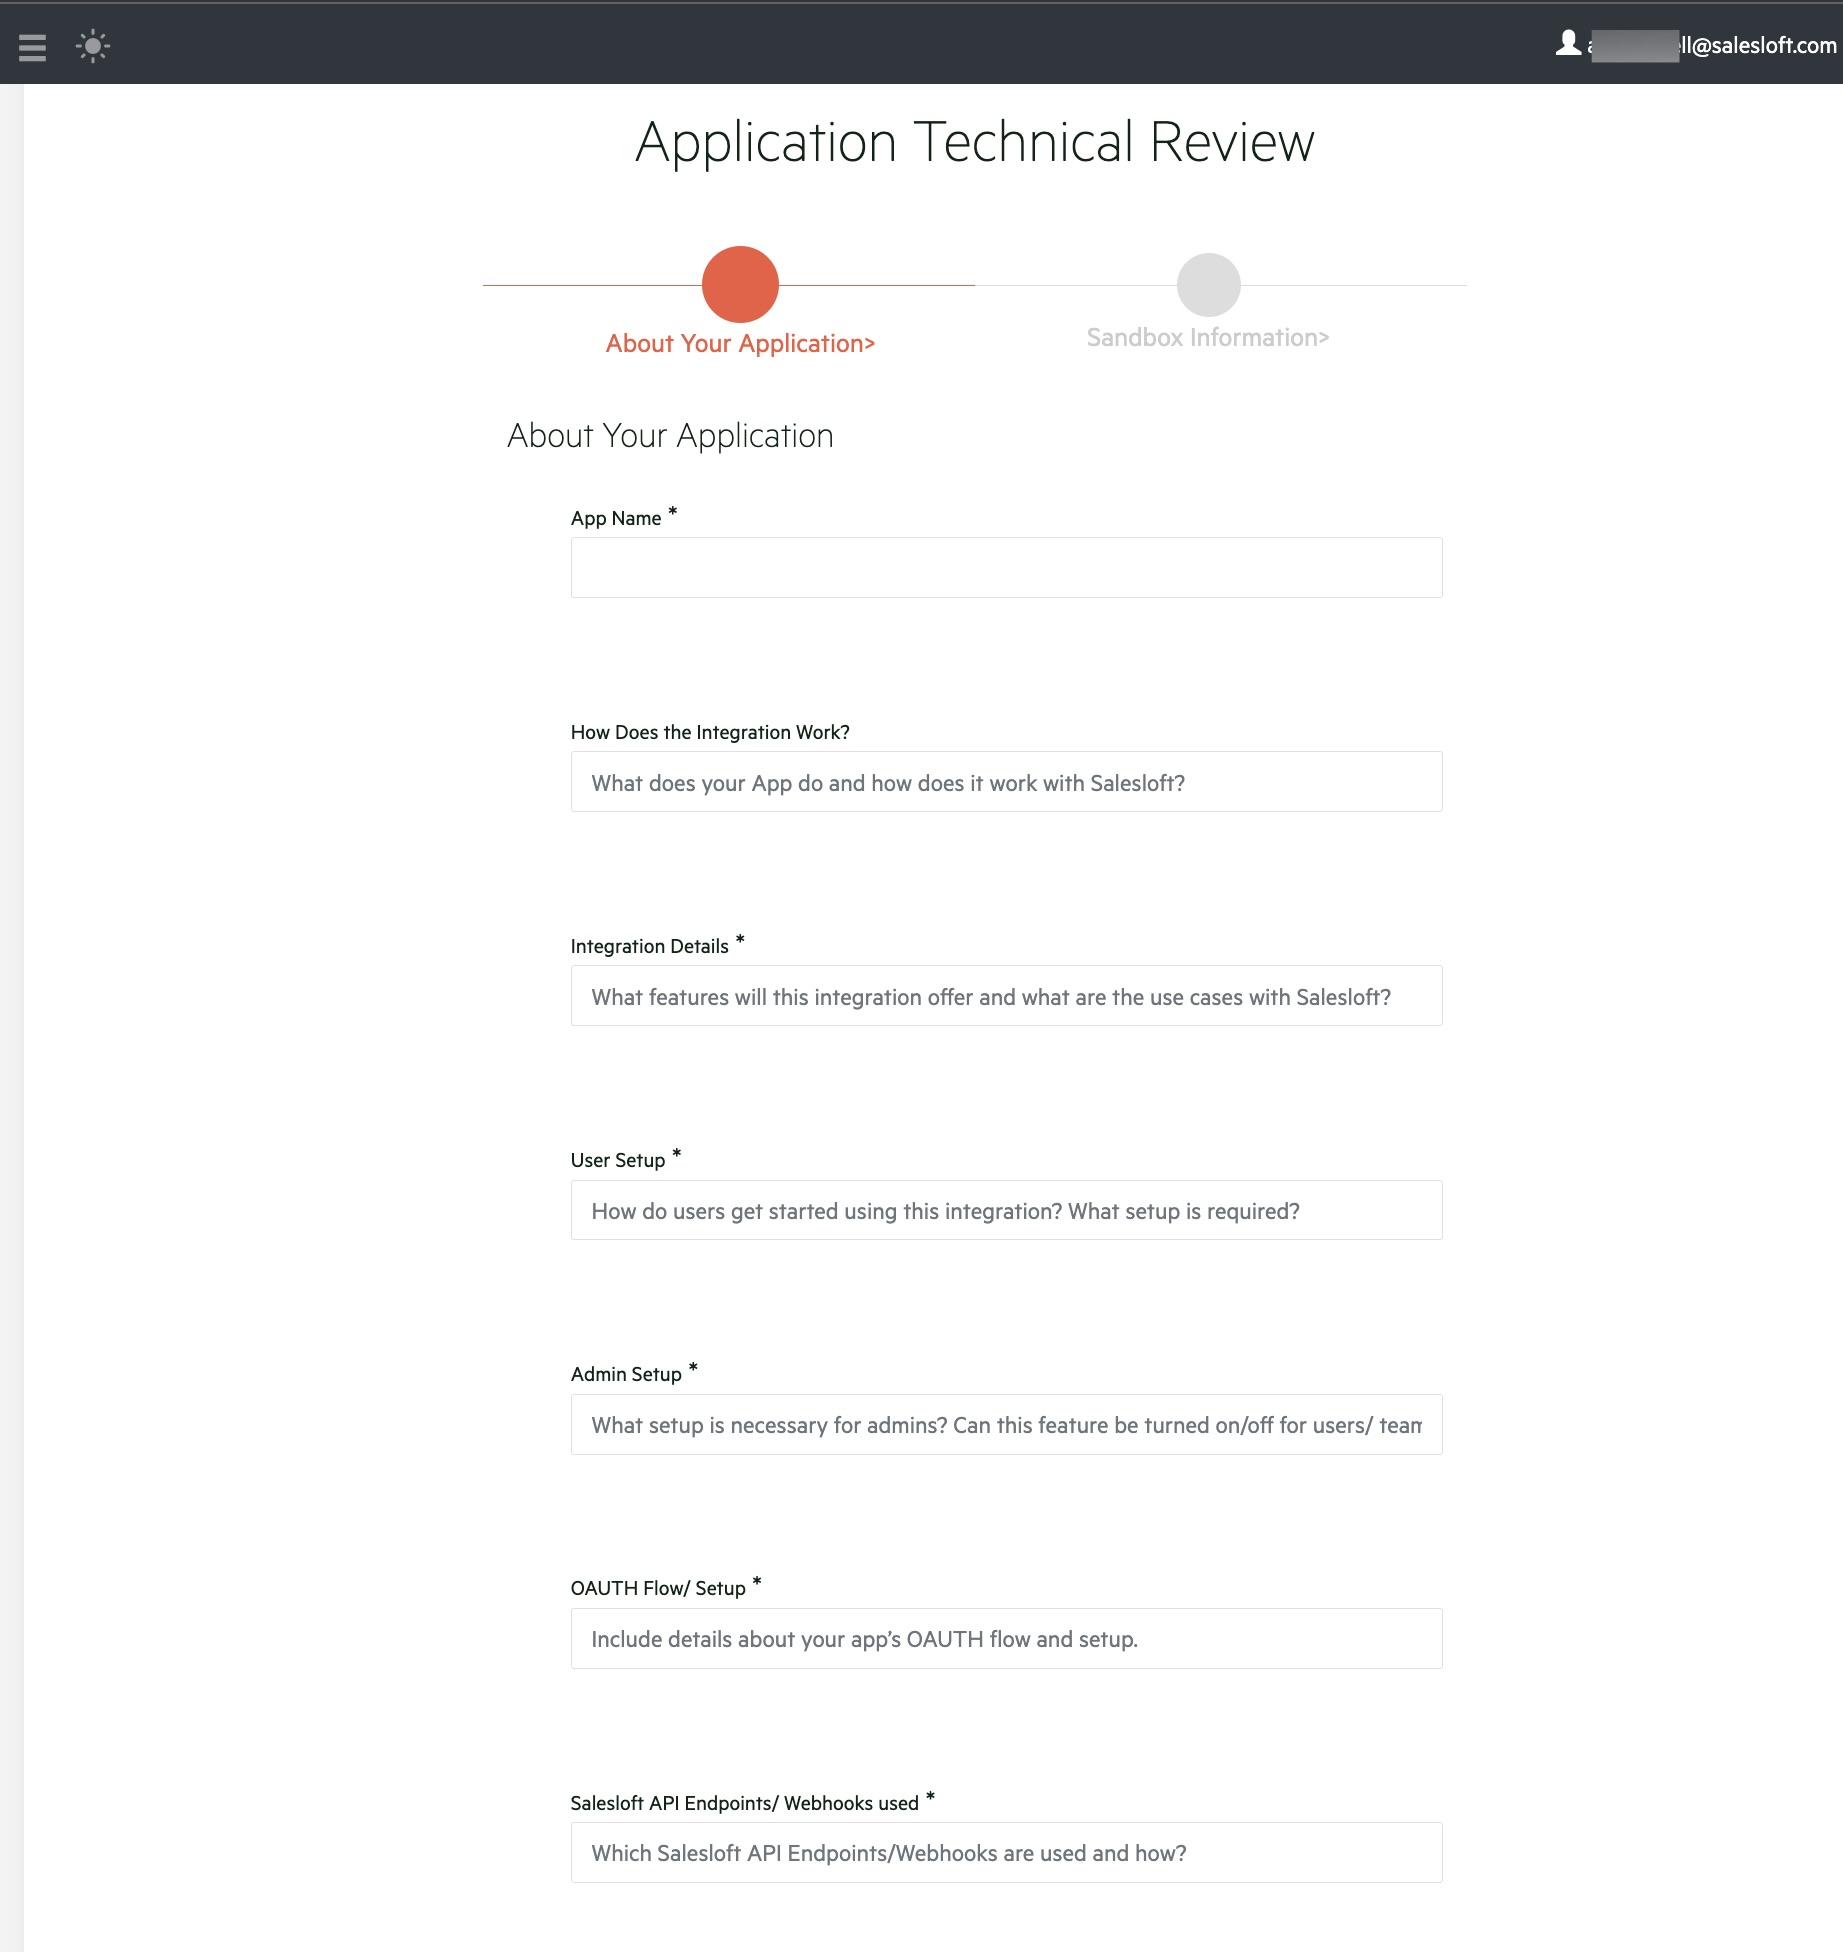
About Your Application:
- App Name
- How does the Integration Work?: What does the App do, and how does it work with Salesloft?
- Integration Details: What features will this integration offer, and what are the use cases with Salesloft?
- User Setup: How do users get started using this integration? What Setup is required?
- Admin Setup: What setup is necessary for admins?
- OAuth Flow/Setup: Include details about your app's OAuth flow and setup.
- Salesloft API Endpoints/Webhooks Used: Which are used and how?
- Future Development: Is there any future development that you are planning?
- Reason for Development: Why is this integration being developed? If for mutual customers, please list them.
- Additional Information
- Logomark Graphic: .svg file
- Screenshots: Add images of the product that frame enablement or use.
- Who should users contact for support/troubleshooting?: Enter email address.
- Is Your Application Front-end or OAuth only?: Select Yes or No.
-
Sandbox Information: For Front-End Integrations
- Vendor Dev/Sandbox License
- Username for Dev License
- Password for Dev License
Once you have completed these forms, click the Submit button. Our development team will review your allowlisting request and we will approve or deny (with noted reasons) your request accordingly, with a notification to you via email 7-10 days after we receive your submission.
In the meantime, if you haven't already completed the content for your Salesloft Marketplace listing, you can do so by following the steps to Manage and Submit Your Listing.
Once both your Directory Listing & App have been approved, your profile will be published live on the Salesloft Marketplace, and will be ready for use by customers.
Editing Your Current Listing
- Go to: https://marketplace.salesloft.com/, and in the Search box on the left, find your listing by typing in your company name, and clicking the populated partner result.
- Once your listing page has opened, in the box on the left, click on the smaller box labeled Claim Listing.
- Fill out the Join the Program form on the next page and click Submit. Even though you are an existing partner, this step is required in order to claim your current listing to make edits and enhancements.
- Once the listing claim has been approved by the Salesloft team, you will receive an email to log in and get started on your listing changes!
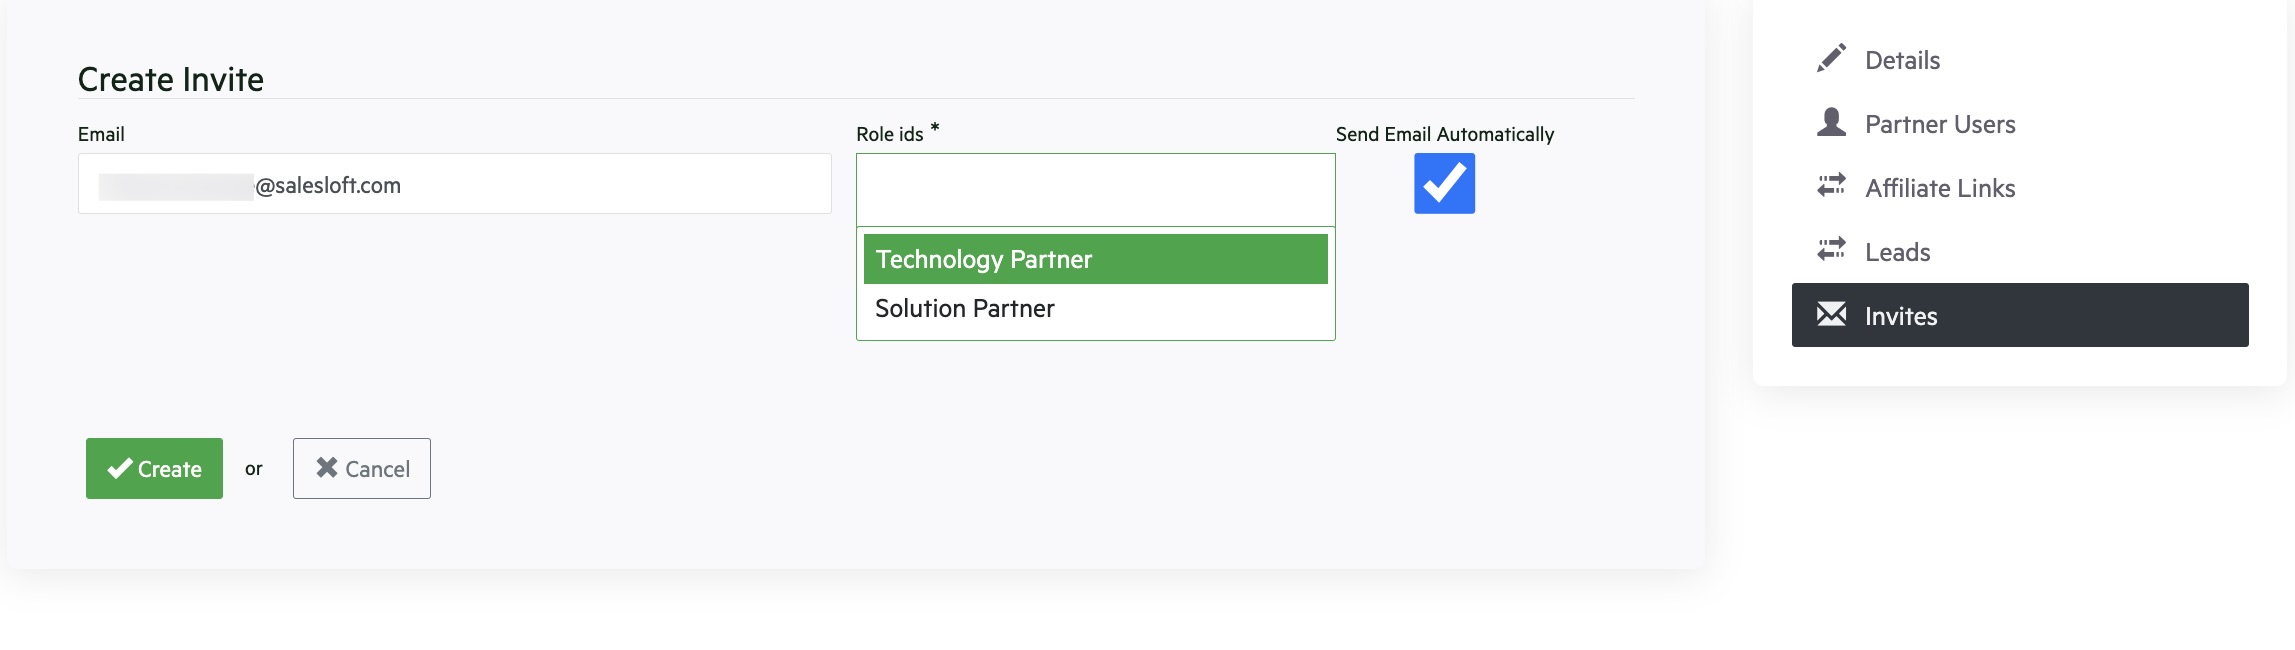
Inviting Other Team Members
By inviting other members of your team to the Marketplace, they are able to make changes to your listing, and submit your app to be allowlisted and approved by the Salesloft Team. There are two ways to do this:

- From the Dashboard, scroll down to the setup section, and click invite users. On the top right side, click the Green Create Invite button. Enter in the email of the user, and choose Technology Partner as the Role ID; Click Create.
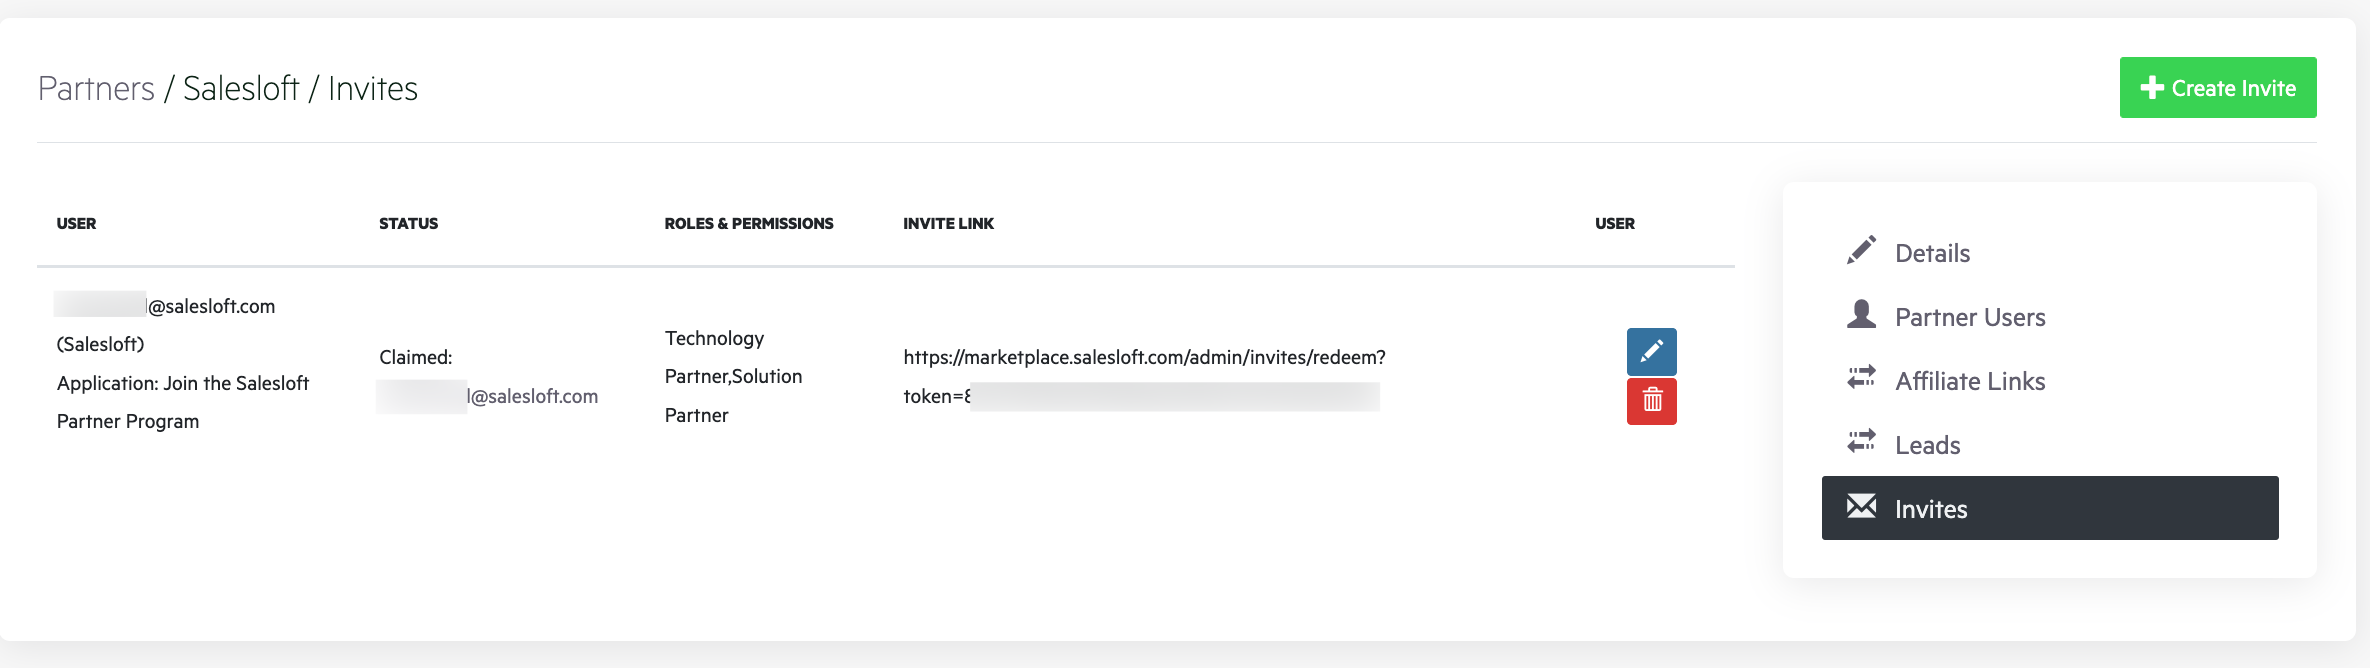
- From the left Navigation Menu, click Settings. Next, click Invites in the menu on the right side. On the top right side, click the Green Create Invite button. Enter in the email of the user, and choose Technology Partner as the Role ID; Click Create.
After these steps, the new user will receive an email to join the Salesloft Marketplace. The user will then be prompted to create their account, and choose a password. The credentials will be created, and they will be set to get started.
The Salesloft Marketplace and Developer Support teams would love to help if you have any questions about building your app or submitting it to theSalesloft Marketplace, so do say hello to them at partners@salesloft.com.