Connect Salesloft
Using Tray’s instructions, set up authentication with Salesloft. This OAuth connection allows Tray to act on behalf of an authenticated user. Ensure that you are an admin in Salesloft or have permission to access all relevant data.
Connect/Determine your source
Connect: Using Tray’s instructions, set up authentication with your other data source (e.g., Databricks). This usually requires coordination with the application owner/admin in your business. Tray gives instructions on how to find these authentication details in the corresponding applications.
Strategize: This is also a good time to talk to the admin about how to get the data you’re looking for.
Best Practice: Questions for your admin:
- What table/part of the app does this data live in?
- Can you provide me with a query for this table? (select * from company_accounts where propensity_score is not null)
- Can this query be written to only return results within a given time frame?
- How often should I query this table in production?
Create your Custom Field
Navigate to the Salesloft Field Configuration page in Settings, create a custom field that corresponds to your data object. If you’re using an account attribute, create an Account Custom Field. If you cannot see this page, ask your Salesloft admin to do this for you.
In our example, we will create an Account custom field that corresponds to the usage of our product, Rhythm.
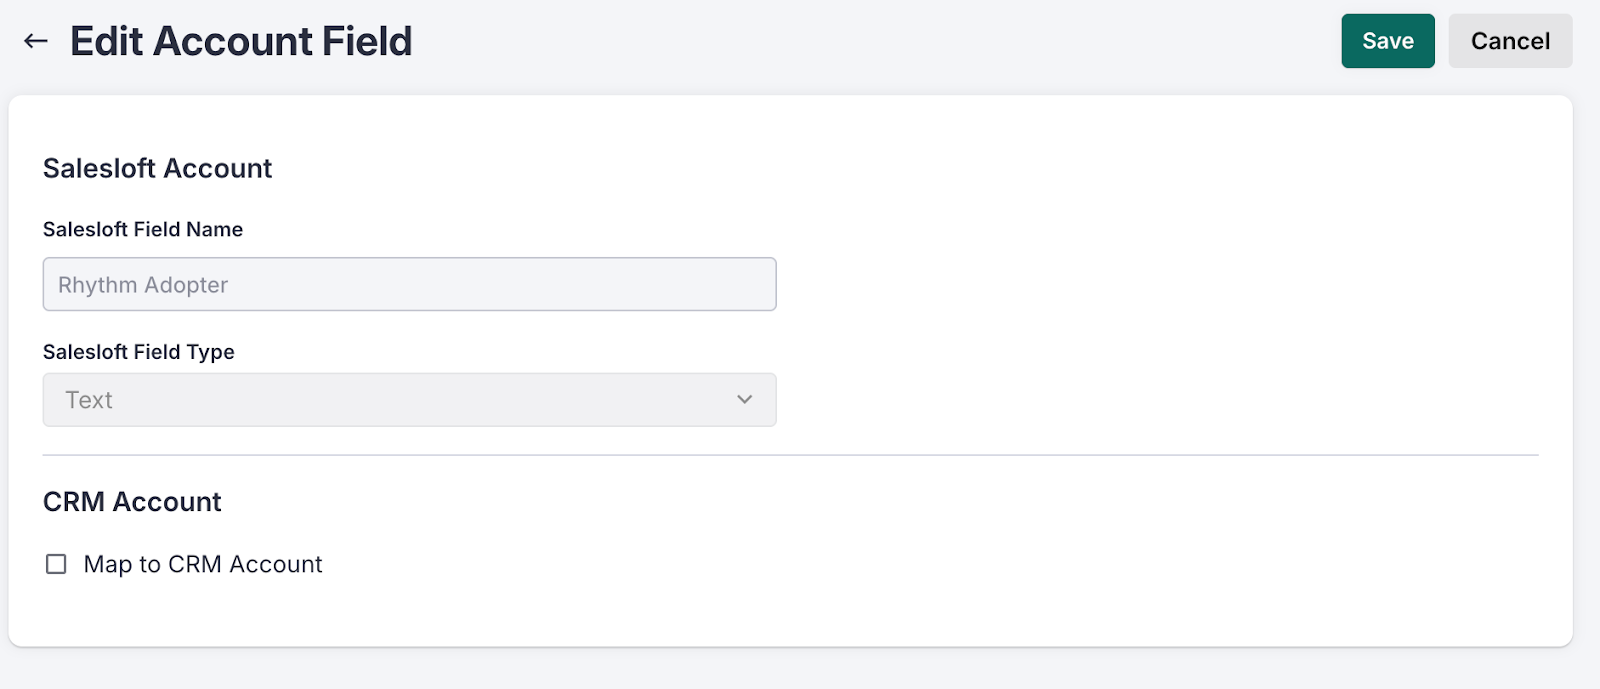
Save the name of the field you created for use later.
Play Set Up
Set up a Play in Salesloft for “Account Created” or “Account Updated. When creating criteria, find the custom field you created. The “has changed” and “has changed to” condition should prevent your team from receiving updates if the object is updated, but there are no changes to the field you plan to use as a signal.
Update the Play name to customize what shows up in Rhythm.
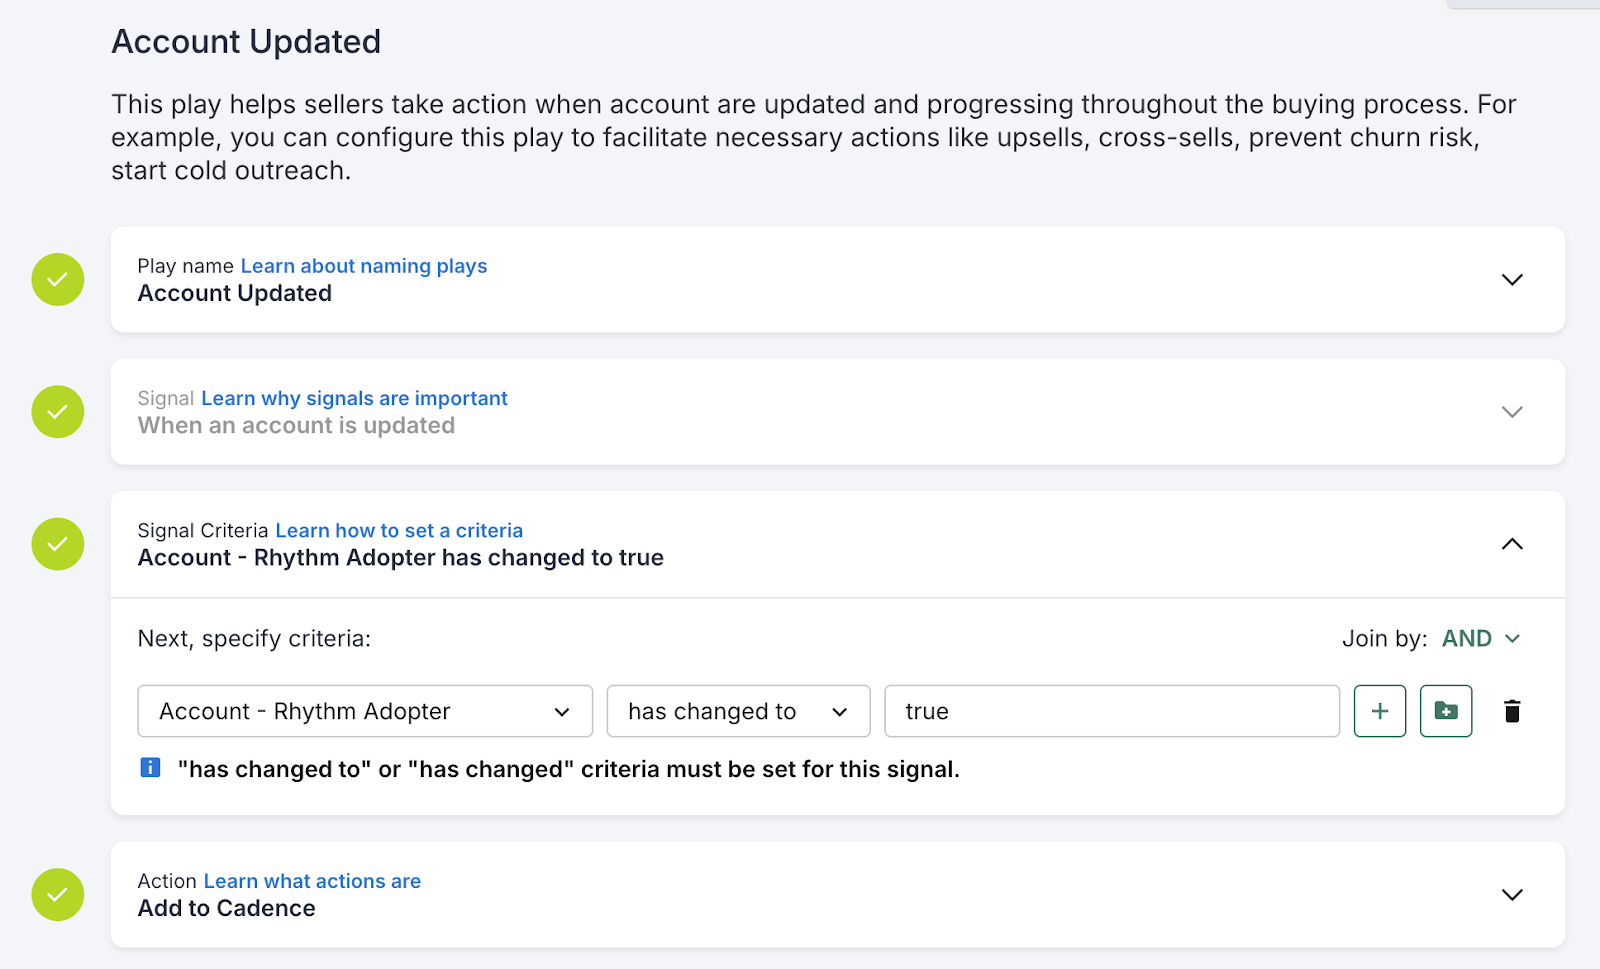
Save and Enable the Play
Use a template
Import and/or copy one of these templates into a Tray project and begin building. If you’re not using one of the named solutions below, you can start with the template and use the frameworks with BigQuery, Power BI, etc.
- Import Databricks rows into Salesloft for account-based Signals
- Import Databricks rows into Salesloft using CRM ID
- Import Looker Rows into Salesloft for account-based Signals
- Import MixPanel Product Adopter into Salesloft
- Import Snowflake Rows to Salesloft accounts Signals
MixPanel
Updating an Account Record Based on Product Usage
Use Case: Salesloft wants to begin identifying champions of their Rhythm product for a retention sales motion. Today, they log all in-app events related to Task completion in MixPanel. Steven has coordinated with the MixPanel admin and identified that he can create a group of users (i.e., a cohort) that have completed a certain number of Tasks. After creating this cohort of users in Mixpanel, he can now use the Tray.AI template for product usage to:
- Identify users who meet these criteria
- Update Salesloft Accounts
- Use his newly created custom field to drive actions for his team
Steps
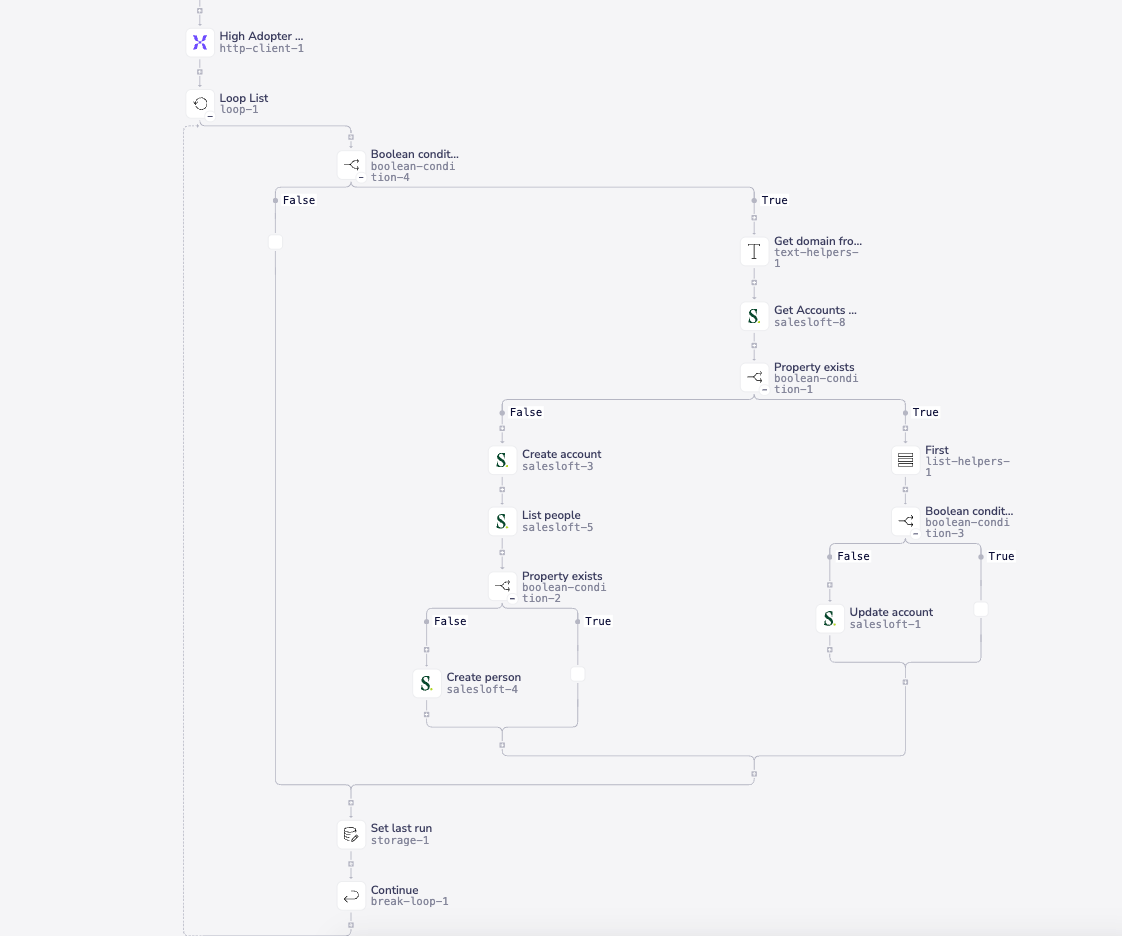
- Query your source for the data. In this Mixpanel example, Steve is using Mixpanel’s Query API, to get a list of people who are a part of his Rhythm “High Adoption” Cohort.
- Loop through the data: This template loops through the data from Mixpanel to identify each user in the cohort.
- We use a Text Helper in Tray to grab the domain of the account by using the user’s email address
- Find the Account: Use the “List Account” action using the Salesloft Connector. Since we retrieve the domain from the email address, we will use this as our primary identifier in Tray to see if the account exists in Salesloft.
- Our template includes a special parameter for domain[_contains] when searching the account in Salesloft. If the Account is not in Salesloft, we will create it using the domain.
- Update the Salesloft Account Record: If the account is found, we proceed down the update flow. The update flow assumes that multiple accounts might be returned, and if so, we grab the most recent one by adding the Accounts to a list and getting the first one. The next steps use the "Update Account" action provided by the Salesloft connector.
- We will use the custom field from our previous steps to update that account in Salesloft with a value of true.
- Create Person if available (Optional): We have detailed information about the person, their role, etc., so we will also update the Person information in Salesloft.
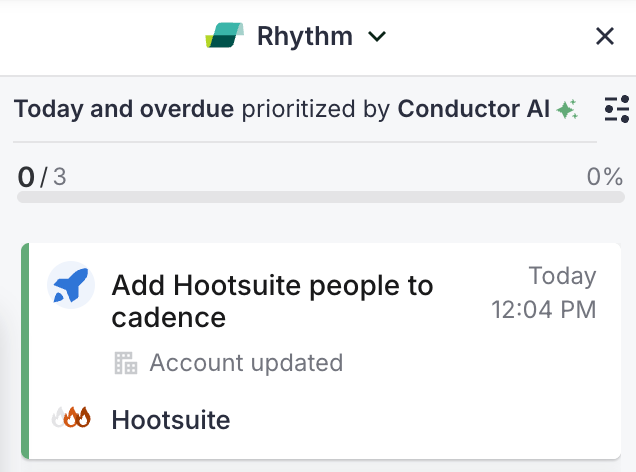
- Salesloft Account Updated Play: Now that data is flowing with no errors, we can check Salesloft to see if our Task was created.
Final Result
After your workflow has run, you will see Salesloft Tasks in Rhythm related to the data update.
DataSource Details
- Retrieving an identifier when duplicates exist - In the example above, the workflow turns a Person-based data source into an Account-based workflow by retrieving the domain from the email address. The workflow then does a manual lookup of the Account because it assumes that there could be accounts with duplicate domains.
- The List Helper called “First” retrieves the most recently updated account, assuming that it is the correct account in Salesloft. It will then update that Account using the ID retrieved.
Databricks
Updating an Account Record Based on a Database Query
Identify a database table that contains data points about your leads or customers, such as their recent engagement with your product or specific actions they have taken. The goal of this workflow is to reflect this data in Salesloft on the corresponding Account record.
Your table will need:
- Your Signal data/custom value
- A Salesloft identifer like CRM_ID
- Account Domain, if your workflow will create Accounts
Account Signals using Account Upsert (SFDC only)

- Set up a frequency. Since these Account updates are considered signals, a daily frequency is a common best practice.
- Set up a step to query your database table. This query should be designed to retrieve the relevant information for a specific set of records based on your criteria. For instance, you might want to find all Accounts that have recently reached a certain level of product engagement.
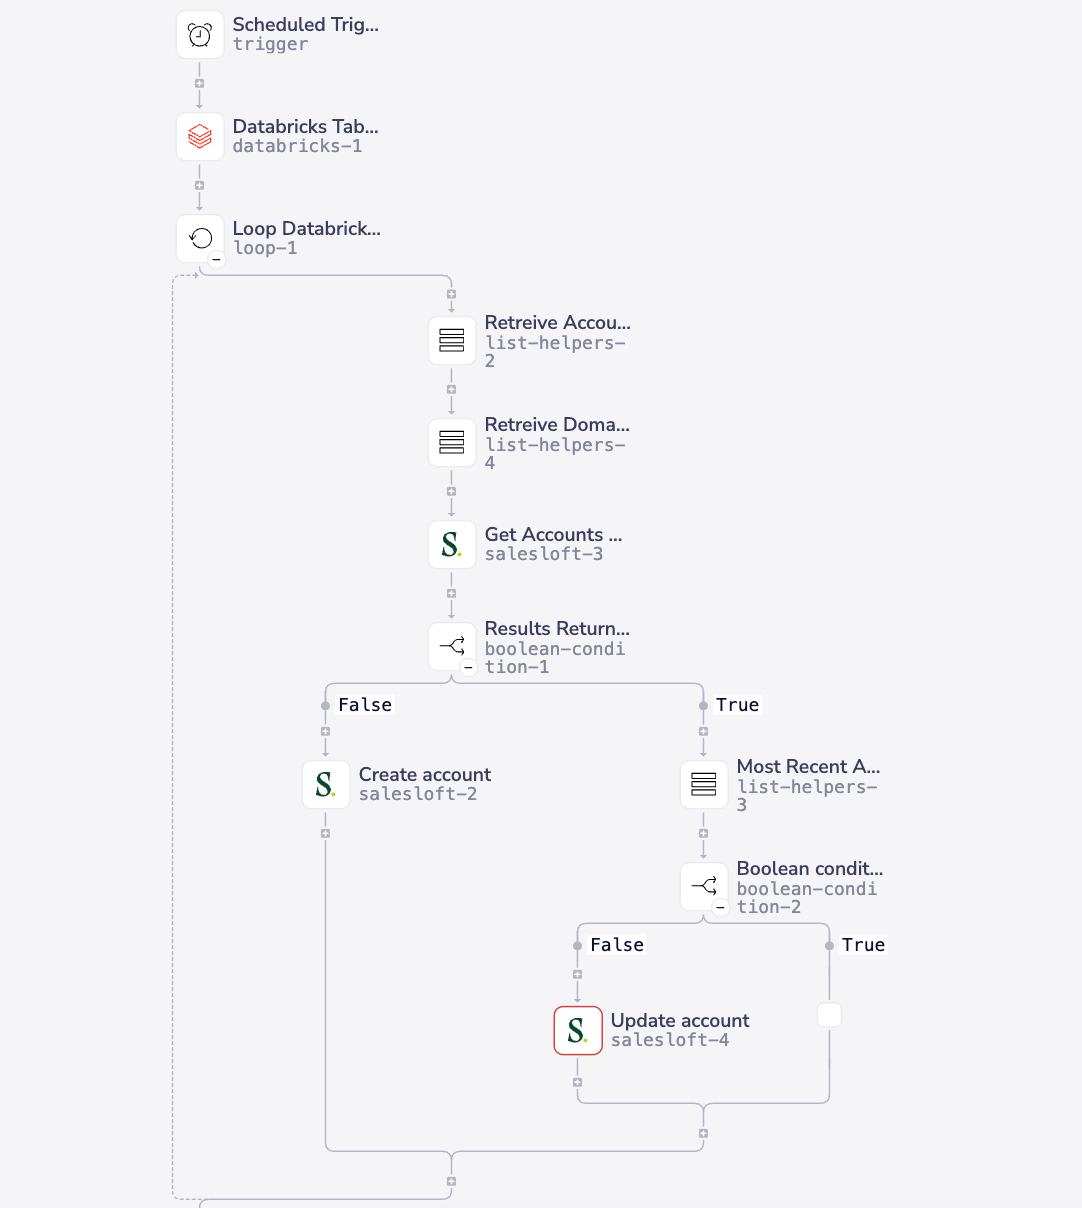
- Retrieve values from the index: Once we have the results from our database query, we need to retrieve the necessary values from the Databricks index. Here we are retrieving the Account Name, Domain, and Custom Value.
- Identify the Salesloft Account: Once we have the results from our database query, we need to identify the corresponding Account record in Salesloft.
- Use the Upsert action provided in our template using the Salesloft Connector. You will need to use a unique identifier from your database record (such as domain or crm_id) to search for the matching Account in Salesloft. You will need to map the appropriate field from your database query to the search criteria in the "List Account" action.
- CRM_ID Upsert is only available for Salesforce today
- SFDC Only - Upsert the Salesloft Account Record with custom field: After successfully finding the Account in Salesloft, you can now use the "Upsert Account" action.
- You will need to map the relevant data fields from your database query results to the specific fields you want to update on the Salesloft Account record. This could include custom fields you have created to track product engagement scores, last login dates, or specific feature usage.
Account Signals using Account Lookup
Steps
- Set up a frequency. Since these Account updates are considered signals, a daily frequency is a common best practice.
- Set up a step to query your database table. This query should be designed to retrieve the relevant information for a specific set of records based on your criteria. For instance, you might want to find all Accounts that have recently reached a certain level of product engagement.
- Retrieve values from the index: Once we have the results from our database query, we need to retrieve the necessary values from the Databricks index. Here we are retrieving the Account Name and Domain.
- Look up the Salesloft Account: Once we have the results from our database query, we need to identify the corresponding Account record in Salesloft.
- This flow uses the “List Account” action to find the Salesloft account by crm_id or domain. We are using a special parameter for domain[_contains] when searching the account in Salesloft. If the Account is not in Salesloft, we will create it using the domain.
- Create Account with custom field: If no account exists, we proceed to create the Account. This step also passes along our custom field value from Databricks.
- Update Account with custom field: If an account exists, we use the “Update Account” action. The update flow assumes that multiple accounts might be returned, and if so, we grab the most recent one by adding the Accounts to a list and getting the first one. If you’re using crm_id lookup, you can bypass this step. This step also sets a custom field value.
Final Result
After your workflow has run, you will see Salesloft Tasks in Rhythm related to the data update.
DataSource Details & Intermediate Steps
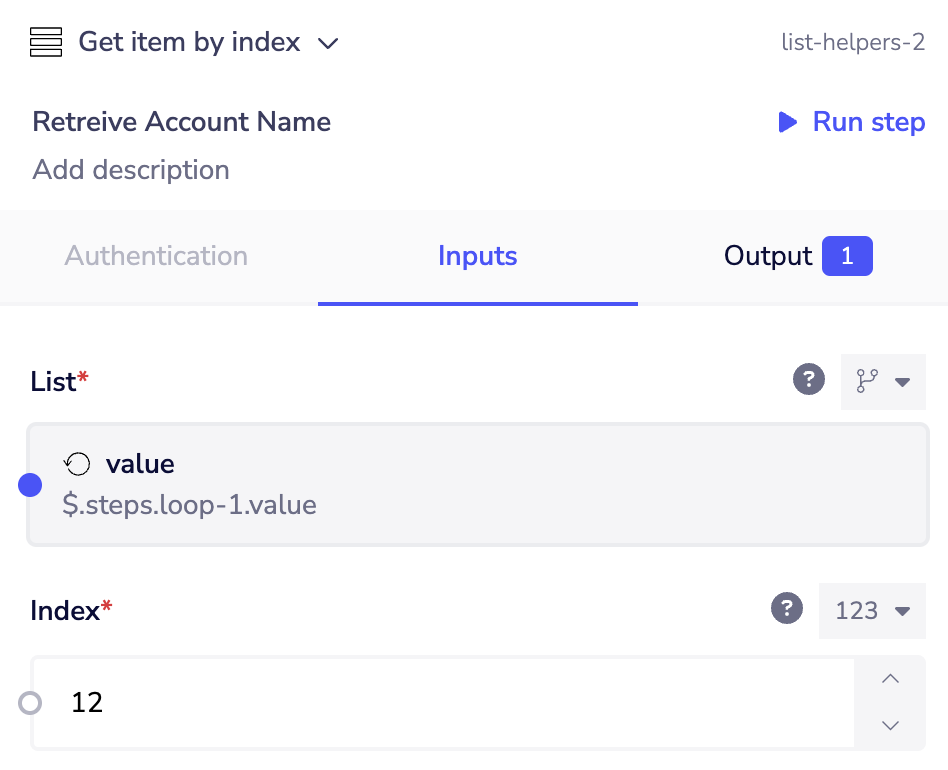
- Databricks Array - The template here uses two mechanisms to use data from the Databricks API. The List Helpers called “Get item by index” find the appropriate values from the response that we want to use and then feed them as values into the Salesloft Upsert Action.
- Index 12 in the array of rows is the Account Name

Snowflake
Updating an Account record based on a database query
Identify a database table that contains data points about your leads or customers, such as their recent engagement with your product or specific actions they have taken. The goal of this workflow is to reflect this data in Salesloft on the corresponding Account record.
Your table will need:
- Your Signal data/custom value
- A Salesloft identifer like CRM_ID
- Account Domain, if your workflow will create Accounts
Account Signals using Account CRM ID as the identifier
Steps
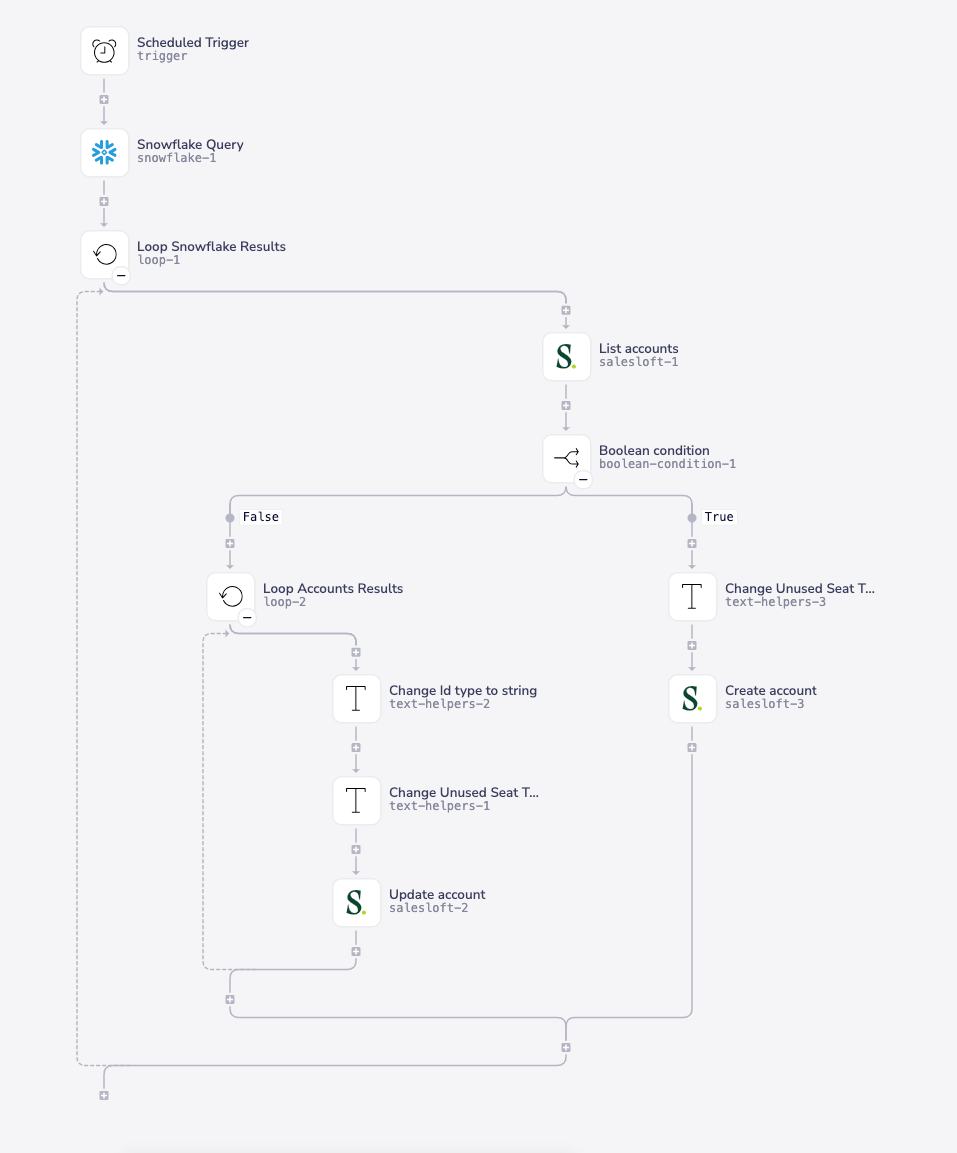
- Set up a frequency. Since these Account updates are considered signals, a daily frequency is a common best practice.
- Set up a step to query your database table. This query should be designed to retrieve the relevant information for a specific set of records based on your criteria. For instance, you might want to find all Accounts that have recently reached a certain level of product engagement.
- Look up the Salesloft Account: Once we have the results from our Look, we need to identify the corresponding Account record in Salesloft.
- This flow uses the “List Account” action to find the Salesloft account by crm_id or domain. We are using a special parameter for domain[_contains] when searching the account in Salesloft. If the Account is not in Salesloft, we will create it using the domain.
- Create Account with custom field: If no account exists, we proceed to create the Account. This step also passes along our custom field value from the Look.
- Update Account with custom field: If an account exists, we use the “Update Account” action. The update flow assumes that multiple accounts might be returned, and if so, we grab the most recent one by adding the Accounts to a list and getting the first one. If you’re using crm_id lookup, you can bypass this step. This step also sets a custom field value.
Final Result
After your workflow has run, you will see Salesloft Tasks in Rhythm related to the data update.
DataSource Details & Intermediate Steps
- Data Formats - Depending on the format of the data, you may need to change its type at some point in the workflow.
Looker
Updating a Salesloft Account record based on a Look
The goal of this workflow is to update records in Salesloft with the values from your Look. Steps:
- Identify a Looker Look that contains data points about your leads or customers. This may involve creating a Look from an existing dashboard or Explore framework.
- Retrieve from ID the Look URL.
Your Look should contain these columns:
- Your Signal data/custom value
- A Salesloft identifer like CRM_ID
- Account Domain, if your workflow will create Accounts
Importing from Looker with Account CRM ID or domain as the identifier
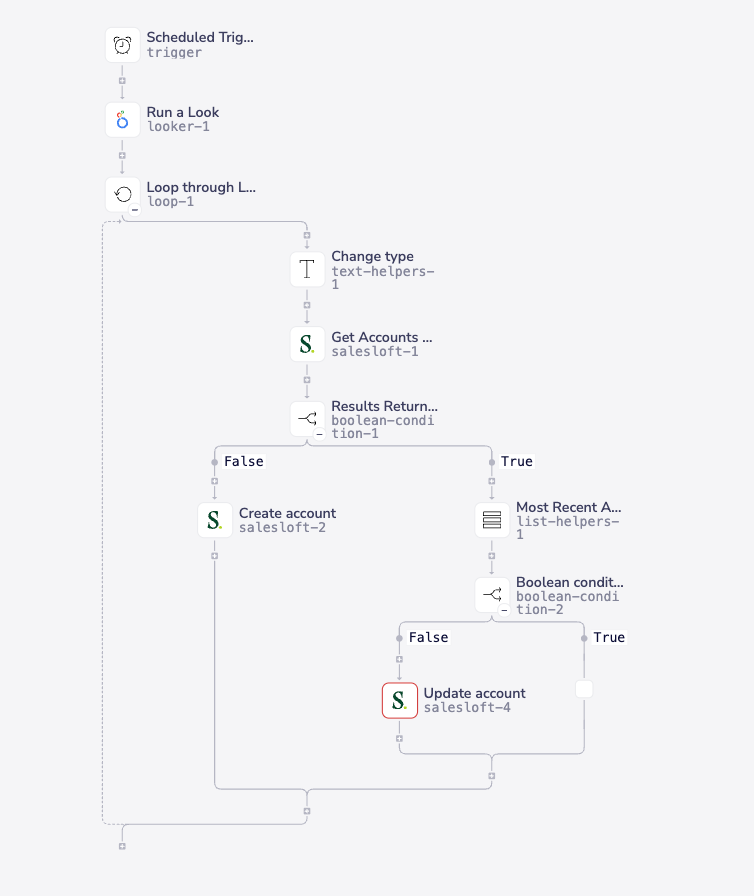
Steps
- Set up a frequency. Since these Account updates are considered signals, a daily frequency is a common best practice.
- Run a Look: This step utilizes the Looker “Run a Look” API. It returns the Look columns and rows in the payload.
- Loop through the response from Looker - Loop through the data elements and change the types of any attributes that you might use later in the workflow.
- Look up the Salesloft Account: Now that we have updated types, we need to identify the corresponding Account record in Salesloft.
- This flow uses the “List Account” action to find the Salesloft account by crm_id.
- Create Account with custom field: If no account exists, we proceed to create the Account. Since the Account domain is required, this flow attempts to manufacture one by making the domain crm_id.com. This pattern can be changed or updated.
- This step also passes along our custom field value from Snowflake.
- Update Account with custom field: If an account exists, we use the “Update Account” action to update the account. This step also passes along our custom field value from Snowflake.
Final Result
After your workflow has run, you will see Salesloft Tasks in Rhythm related to the data update.